A company books a 10x10 booth at the show that matters most in its category. The space costs somewhere between four and eight thousand dollars. Flights, hotel and four days of three people's time cost about the same again. Somebody remembers the graphics eleven days out, gets a quote for a backwall and two banners, approves it, and is quietly pleased at how cheap the graphics turned out to be relative to everything else.
Then the show contractor's invoice arrives with a line item for shipping direct to show site rather than to the advance warehouse, because the warehouse stopped receiving before the artwork was even approved. The backwall's headline is unreadable from the aisle because it was written at desk distance on a laptop. The bottom third of it — which carries the three product names the whole trip was meant to promote — is behind a counter and two people's shoulders for all four days. And the follow-up email to the 214 scanned badges goes out eleven days after the show, because nobody built it before travelling and everybody came back to a backlog.
None of that is a design failure. All of it is a sequencing failure, and it happens because trade show checklists are written as packing lists.
Search for one and you will find genuinely well-meaning material: bring business cards, bring comfortable shoes, bring a power strip, design an eye-catching booth. It is not wrong. It is simply operating at the wrong altitude for the decision you actually face, which is that you have a fixed date, a fixed set of surfaces, a set of production processes with real lead times, and a second set of deadlines published by somebody else that will almost always bite before your printer's do.
This is the exhibitor's version. Every graphic a booth needs, what each display system demands from the artwork, how long each one takes to make, which of them can be saved at the last minute and which cannot, and the two independent deadline stacks you have to schedule against.
The checklist you were given is not the checklist you need
There are two completely different jobs that both get called trade show planning, and almost every checklist online blends them into an unhelpful average.
The first is organising an event. You control the venue, the floor plan, the wayfinding, the badges, the stage, the programme and the sponsor recognition. Your deadlines are set by your own suppliers and by the venue's access window, and the countdown for that job is a different document — the event production timeline covers it, and if you are running the show rather than taking a booth at it, that is the schedule you want.
The second is exhibiting at someone else's event. You control a rectangle of carpet and the surfaces you put in it. Everything outside that rectangle — freight, storage, delivery to your space, electrical, rigging, labour, when your crate is allowed to arrive and when it is allowed to leave — is governed by an official show contractor whose deadlines are published in a document called the exhibitor manual or exhibitor service kit.
This article is about the second job, and the distinction matters more than it sounds. As an exhibitor, the deadlines that will actually hurt you are not the ones your suppliers set. They are the ones in a PDF somebody emailed you when you booked the space, which most exhibitors first open about three weeks before the show.
A word on the numbers throughout. Every lead time, dimension and price below is a typical working range in the United States, offered so you can build a schedule before you have quotes. They move with substrate, city, season, supplier queue and show. Confirm each one against your actual printer, your actual frame manufacturer and your actual exhibitor manual — and confirm the manual figures the week you book the space, not the month you exhibit.
Two deadline stacks, and the earlier one governs
Here is the structural idea that makes the rest of this schedulable.
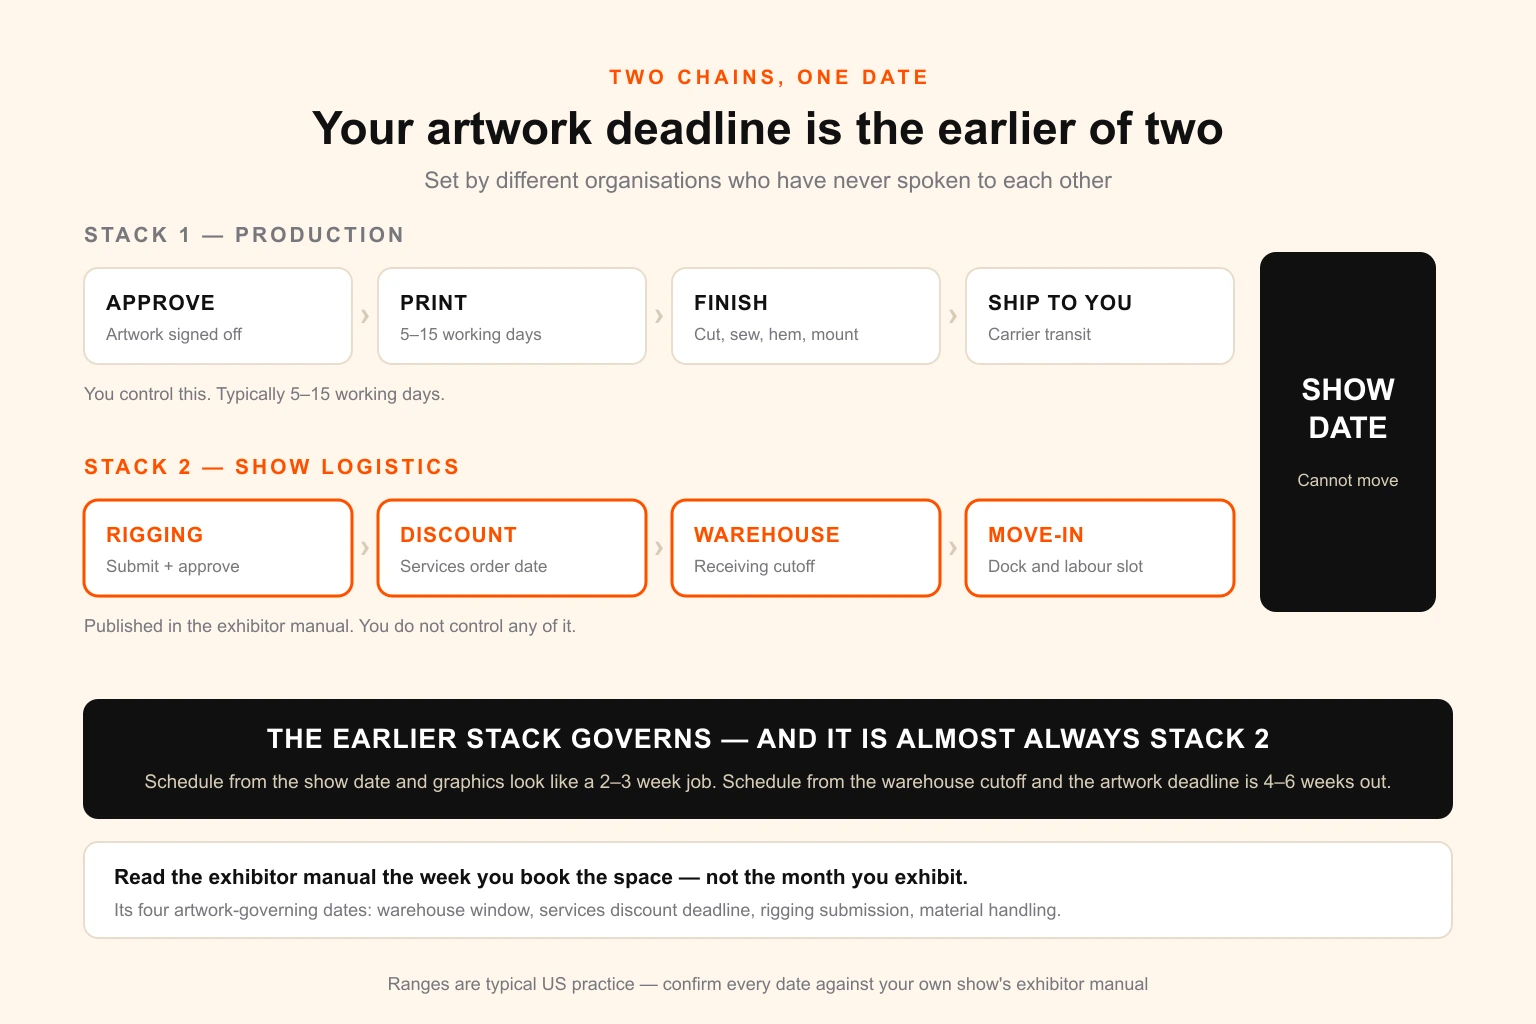
You are working against two independent chains of deadlines that were set by different organisations who have never spoken to each other.
Stack one is production. Approve artwork, print it, finish it, ship it to you. This is the chain most exhibitors think about, and it is comfortably the shorter of the two. Most booth graphics are five to fifteen working days from approved artwork.
Stack two is show logistics. Order show services at the discount rate before that rate expires. Submit rigging plans for approval if you have a hanging sign. Get freight into the advance warehouse before it stops receiving. Have material handling arranged. Be on the labour schedule. None of this is about your graphics at all, and all of it constrains when your graphics have to physically exist.
Your real artwork deadline is the earlier of the two, and it is almost always the second one.
That single reframe changes the plan. Scheduling from the show date gives you a comfortable-looking two to three weeks for graphics. Scheduling from the advance warehouse cutoff — with production, proofing and a shipping transit added underneath — typically pushes the artwork deadline out to four to six weeks before the show, and further if there is a hanging sign or custom fabrication in scope.
What is actually in the exhibitor manual
If you take one operational action from this article, make it this: open the exhibitor manual the week you book the space and write its dates into your own calendar. Four of them govern artwork.
The advance warehouse receiving window. The advance warehouse is the show contractor's storage facility. It typically starts accepting exhibitor freight around thirty days before the show and stops accepting it somewhere in the week or two before move-in. Ship into that window and your crate is delivered to your booth space before you arrive. Miss it and you are shipping direct to show site, which means your freight has to arrive inside a narrow window on move-in day, into a dock queue shared with everyone else, with no slack if a carrier is late. The surcharge is annoying; the absence of margin is the real cost.
The discount deadline for show services. Electrical, internet, furniture, carpet, cleaning, labour and rigging are all ordered through the contractor, and all of them carry a lower rate if ordered by a stated date — commonly three to six weeks out. Missing it is a pure price increase for identical service, and the increase is not small. This deadline has nothing to do with graphics, and it is the one that most reliably teaches a first-time exhibitor to read the manual.
Rigging and hanging sign submission. If your booth qualifies for a hanging sign, the sign has to be ordered, and anything substantial usually needs a drawing or engineering sign-off submitted for approval by a deadline weeks ahead of the show. This is the earliest artwork deadline in the entire project when it applies.
Material handling, also called drayage. This is the charge for moving your freight from the warehouse or dock to your booth and back out again, billed by weight with a minimum. It is one of the largest and least anticipated costs an exhibitor meets, and it has a design consequence people miss: heavier graphics cost more to move, every show, forever. A rigid backwall and a tension fabric backwall may print for similar money, and then the fabric one costs materially less to ship and handle at every event for the rest of its life.
There is a fifth item worth knowing about even though it is not a deadline. Many shows require exhibitors using their own installation crew rather than the official one to file paperwork for an exhibitor-appointed contractor, with insurance certificates, by a deadline. If you are having a local supplier print and install graphics in the show city, check this before you plan around it.
Build the asset list from the booth outward
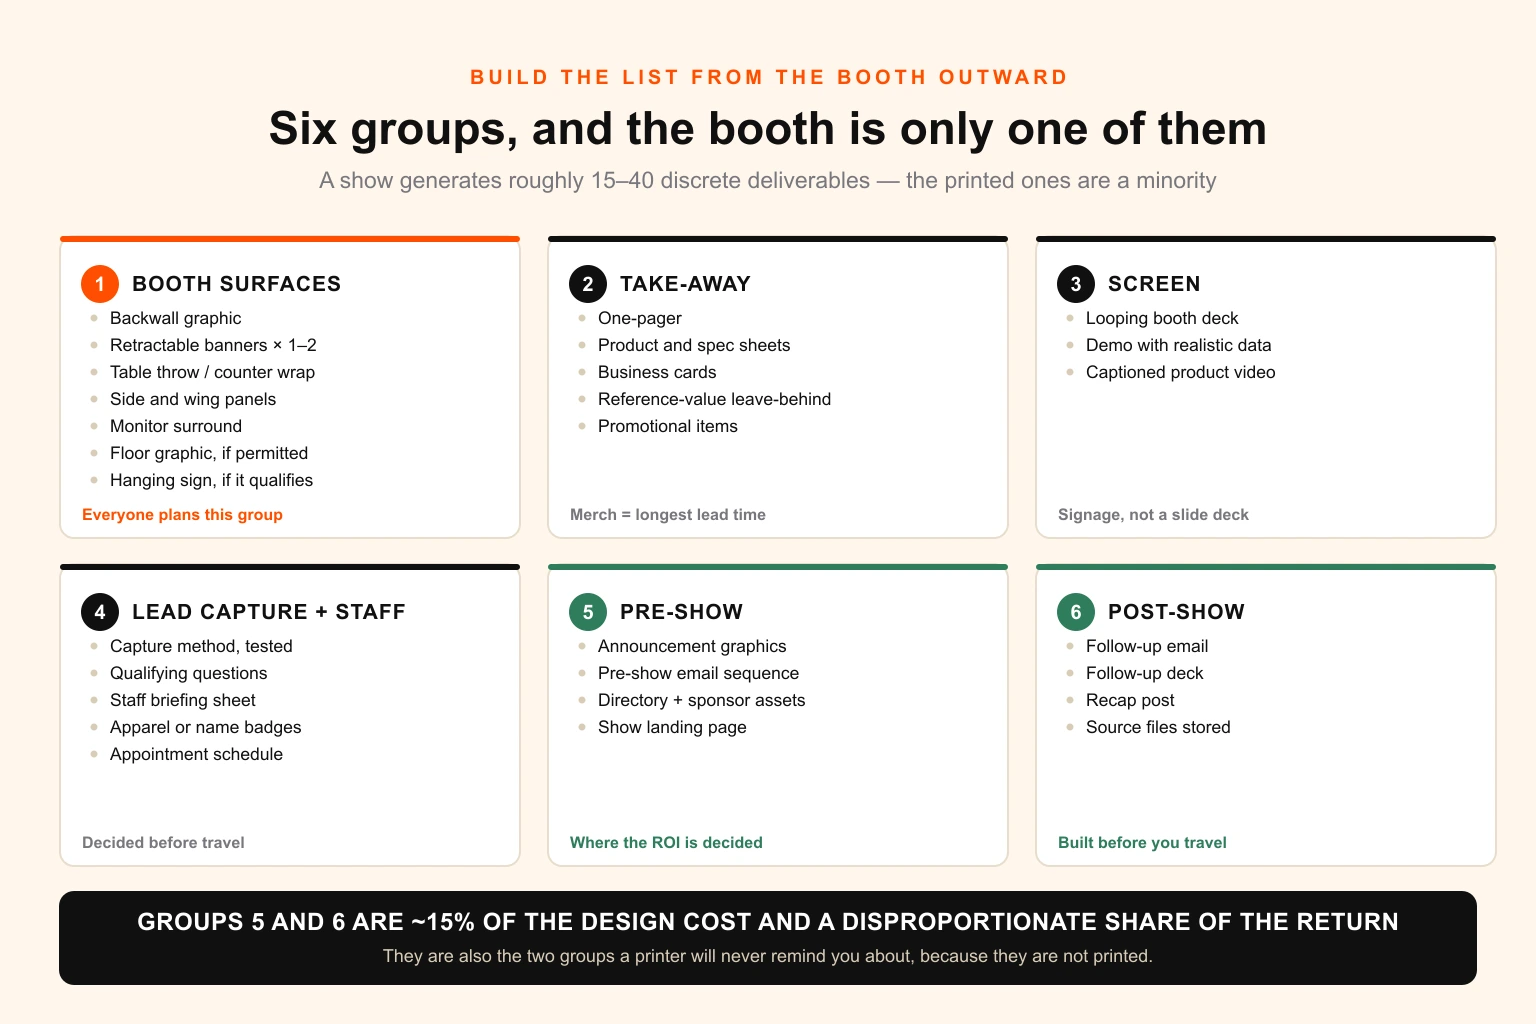
Most exhibitor asset lists are really a printer's product catalogue with checkboxes. That is why they produce booths with four banner stands and no follow-up email. Build the list in six groups instead, in the order a visitor experiences them.
Group 1 — The booth surfaces
These are the ones everybody remembers.
- Backwall graphic. The single most important surface. On a 10x10 inline it is doing all the work of getting someone to stop.
- Retractable or banner-stand graphics. One or two. Useful precisely because they are the cheapest thing to reprint between shows.
- Table throw, table runner or counter wrap. A printed cover for whatever furniture is in the space.
- Side or wing panels, if the frame has them.
- Monitor bezel or screen surround, if you have a screen.
- Literature holder graphics, if you use a stand rather than the counter.
- Floor graphic, if the show and venue permit it — many restrict adhesive to the carpet only, or ban it outright.
- Hanging sign, if the booth type qualifies.
Group 2 — What people take away
- The one-pager. One product or one offer, one page. If you print one thing, print this.
- A capability or line-card overview, if your range is wide enough that one page cannot carry it.
- Product or spec sheets for anything technical, where the buyer will want a number they can check later. If you have a large catalogue, the per-item version of this problem is the same one described in the guide to building a per-SKU asset inventory — you want a template that produces sheets, not thirty separately designed documents.
- Business cards, which are still the fastest way to hand over a person rather than a company. Worth avoiding the small design errors that make them unusable.
- A leave-behind with a reason to keep it — a spec chart, a size guide, a comparison table. Something with reference value survives the hotel bin; a brochure about your values does not.
- Promotional items, if you are doing them. These carry the longest lead time of anything on the list.
Group 3 — What happens on a screen
- A looping booth deck. Silent, readable from three metres, no narration, no small type. This is a design job, not a slide deck, and it is closer to signage than to a presentation built for a room.
- A demo environment or seeded demo data, if you are showing software. Real-looking data, not
test test test. - A short product video, if you have one — captioned, because a show floor is loud enough that nobody will hear it.
Group 4 — Lead capture and the sales floor
- The lead capture method, decided and tested before you travel. A rented scanner from the show, an app, or a paper fallback.
- The qualifying questions, agreed and written down, so three people are collecting comparable information.
- Booth staff briefing sheet — who does what, what the offer is, what a qualified lead looks like.
- Name badges or branded apparel, so visitors can tell staff from other visitors at a glance. This is worth more than it sounds on a crowded floor.
- An appointment schedule, because the meetings that pay for the show were booked before it started.
Group 5 — Before the show
This group is where the return on a trade show is actually decided, and it is the group most often produced last or not at all.
- Announcement graphics for email, social and the website — "come and see us at stand 412".
- A pre-show email sequence to customers and prospects attending, with a booking link.
- Show-directory and sponsor assets — the organiser will want a logo, a description and often an ad, each to its own spec and its own deadline. These deadlines are frequently earlier than the show's logistics deadlines.
- A landing page for the show, so the QR code on your one-pager has somewhere useful to go.
Group 6 — After the show
- The follow-up email, written and designed before you travel.
- The follow-up deck or proposal template, ready to personalise.
- A recap post with photographs of the booth in use, which doubles as next year's promotion.
Groups 5 and 6 are together perhaps fifteen per cent of the design cost of a show and a disproportionate share of its return. They are also the two groups a printer will never remind you about, because they are not printed.
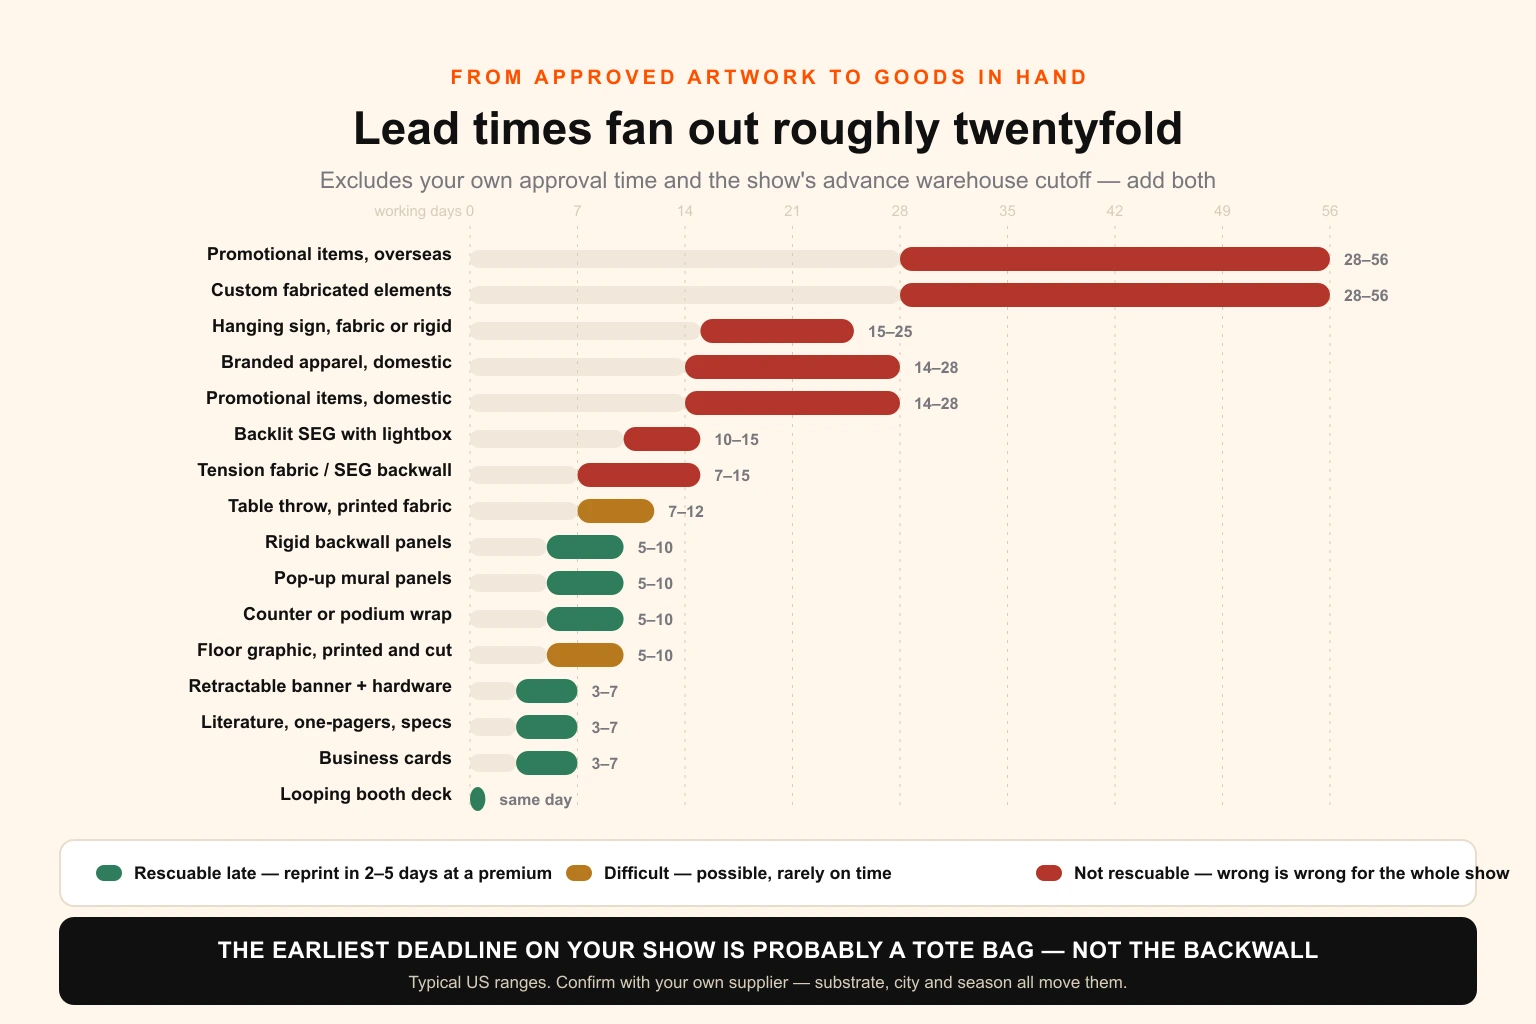
Lead times by display system
Everything below is from approved, print-ready artwork to goods in your hands, excluding your own approval time and excluding transit to the show. The right-hand column is the one to read carefully, because it is a design instruction rather than a warning.
| Asset | Typical production | Order by (before show) | Rescuable late? |
|---|---|---|---|
| Looping booth deck, screen content | Same day | 1 week | Yes — trivially |
| Digital literature: one-pagers, spec sheets | 3–7 working days | 3 weeks | Yes — 2–5 days |
| Business cards | 3–7 working days | 3 weeks | Yes |
| Retractable banner + hardware | 3–7 working days | 3–4 weeks | Yes — 2–5 days |
| Table throw, printed fabric | 7–12 working days | 4 weeks | Difficult |
| Counter or podium wrap, vinyl | 5–10 working days | 3–4 weeks | Yes — at a premium |
| Pop-up mural panels | 5–10 working days | 4 weeks | Yes — at a premium |
| Rigid backwall panels: Foamex, Dibond | 5–10 working days | 4 weeks | Yes — at a premium |
| Tension fabric / SEG backwall | 7–15 working days | 5–6 weeks | No |
| Backlit SEG with lightbox | 10–15 working days | 6 weeks | No |
| Floor graphic, printed and cut | 5–10 working days | 4 weeks | Difficult |
| Hanging sign, fabric or rigid | 15–25 working days | 6–8 weeks | No |
| Custom fabricated booth elements | 4–8 weeks | 8–12 weeks | No |
| Branded apparel, domestic | 10–20 working days | 5–6 weeks | No |
| Promotional items, domestic | 10–20 working days | 5–6 weeks | No |
| Promotional items, overseas | 4–8 weeks + freight | 10–12 weeks | No |
Four readings of that table are worth making explicit.
The spread is roughly twentyfold. Same-day for screen content, eight to twelve weeks for anything fabricated or sourced overseas. A project plan with one line reading finalise booth graphics is wrong for almost every row.
The earliest deadline on your show is probably a tote bag. Not the backwall. Merchandise is manufactured on a long cycle and frequently overseas, which makes it the first artwork deadline in the project despite feeling like the least important item on it. It also means the visual identity has to exist before the merchandise brief does, which for a first-time exhibitor pulls brand identity work forward by a month or more.
Add your own approval time on top of every row. Two rounds of internal review with a stakeholder who travels is a fortnight, and it is nowhere in that table. If the approval chain has more than three people in it, the discipline that saves the schedule is a proper written brief up front — the guide to writing a design brief that gets it right first time exists because round three is almost always the round that breaks a production date.
Then add the show's own deadline underneath. Every "order by" figure above assumes goods ship to you and then to the advance warehouse. Check it against your manual, because a show with an early warehouse cutoff can push all of these out by another one to two weeks.
What each display system demands from the artwork
This is the section that saves reprints, and it is missing from every general trade show checklist because it is the part that requires knowing how the hardware works.
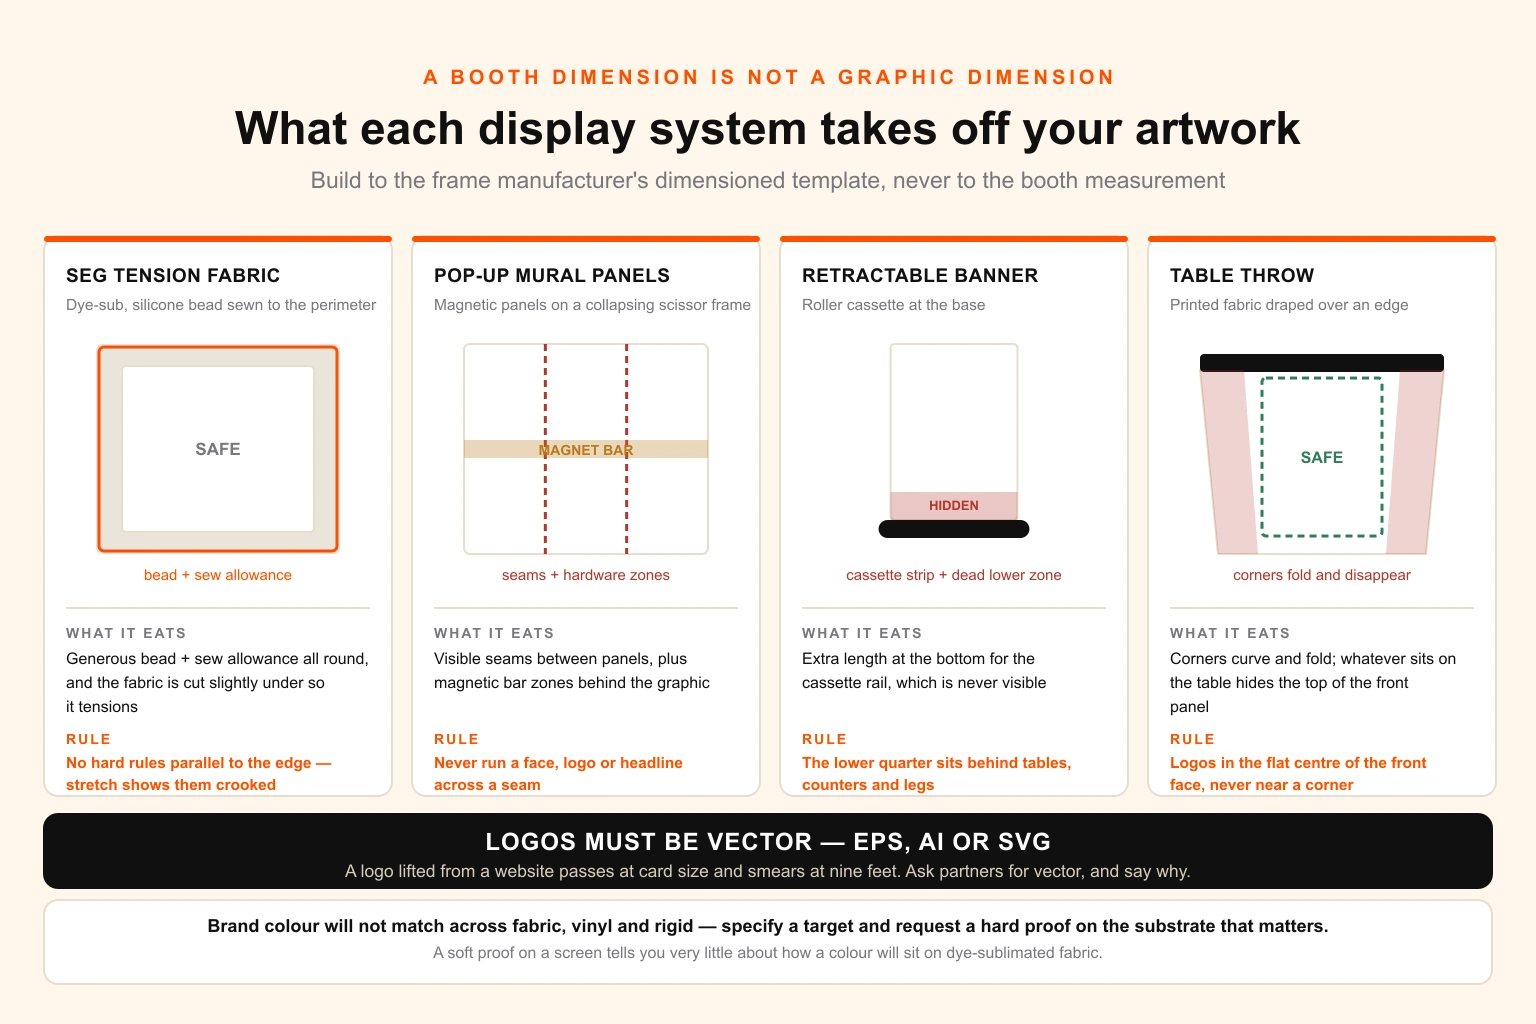
A booth dimension is not a graphic dimension. A 10x10 inline booth has about ten feet of back wall. The graphic that fills it is a different number for every frame system, and the difference is not small — a straight pop-up graphic and a tension fabric backwall for the same booth can differ by well over two feet in width, because one wraps a collapsing scissor frame and the other stretches across an aluminium extrusion. Get the manufacturer's dimensioned template for your specific frame and build to that file. Every reputable frame maker publishes one.
Tension fabric and SEG
Silicone edge graphics are printed by dye sublimation, then cut and sewn with a thin silicone bead around the perimeter that pushes into a channel in the frame. The result is flat, seamless, hardware-free at the edges and washable.
What it demands: a generous allowance around the perimeter for the bead and the sew line, which the printer will specify and which is not the same as ordinary print bleed. Fabric is also usually cut slightly under the frame dimension so it tensions taut, which means your artwork is stretched marginally when installed. The consequences are practical rather than theoretical: keep critical content well inside the safe area, avoid running a hairline rule or a hard geometric edge parallel to the perimeter where any stretch will show it as crooked, and remember that a perfect square in the file is not necessarily a perfect square on the frame.
The other property that matters is that fabric is not opaque. Anything behind a single-sided panel — a light, a wall, the back of a neighbouring booth — can show through. If you need true opacity or a double-sided print, say so at quote stage, because it is a different fabric.
Pop-up mural panels
Panels attach magnetically to a collapsing frame, which produces two constraints you must design around: visible seams where panels meet, and magnetic bar zones where hardware sits behind the graphic. Put a face, a logo or a headline across a seam and it will look broken for four days. The frame template shows both. Design so that seams fall in quiet areas, and treat the panel edges as an intentional part of the composition rather than an accident to be ignored.
Retractable banner stands
Two rules and both are routinely broken.
The first is that the artwork needs extra length at the bottom to attach to the cassette rail, and that strip is never visible. Design as though the bottom few inches of the file do not exist, because for the audience they do not.
The second is more damaging: the bottom of a retractable banner is at the height of a table, a counter and a person's legs. Content in the lower quarter is functionally invisible at a show even though it is technically printed. More on this below, because it applies to every surface in the booth.
Table throws and fabric furniture covers
Printed fabric drapes over an edge and falls in folds. Anything positioned near a corner or an edge will curve, fold or disappear, so logos belong in the flat centre panel of the front face, not the corners. Then subtract the height of whatever sits on the table. A stack of literature and a laptop remove a surprising amount of the visible front panel.
Hanging signs
The heaviest constraints of anything on the list. Permitted only for qualifying booth types, usually large islands. Typically double-sided or four-sided, which means the artwork is a set rather than a single file, and the design has to read from every approach. Rigging has to be ordered and often approved. It is fabricated weeks ahead and cannot be changed. Put your company name and nothing else on it — a hanging sign is a wayfinding device, not a message board, and it is read from thirty metres away by someone walking.
Floor graphics
Check permission first — many venues restrict adhesive graphics to the carpet, and some ban them entirely. Where allowed, the material must be rated for slip resistance and for the surface it goes on, and the design should assume it will be walked on, scuffed and partially obscured by feet within the hour.
The specs that apply to everything
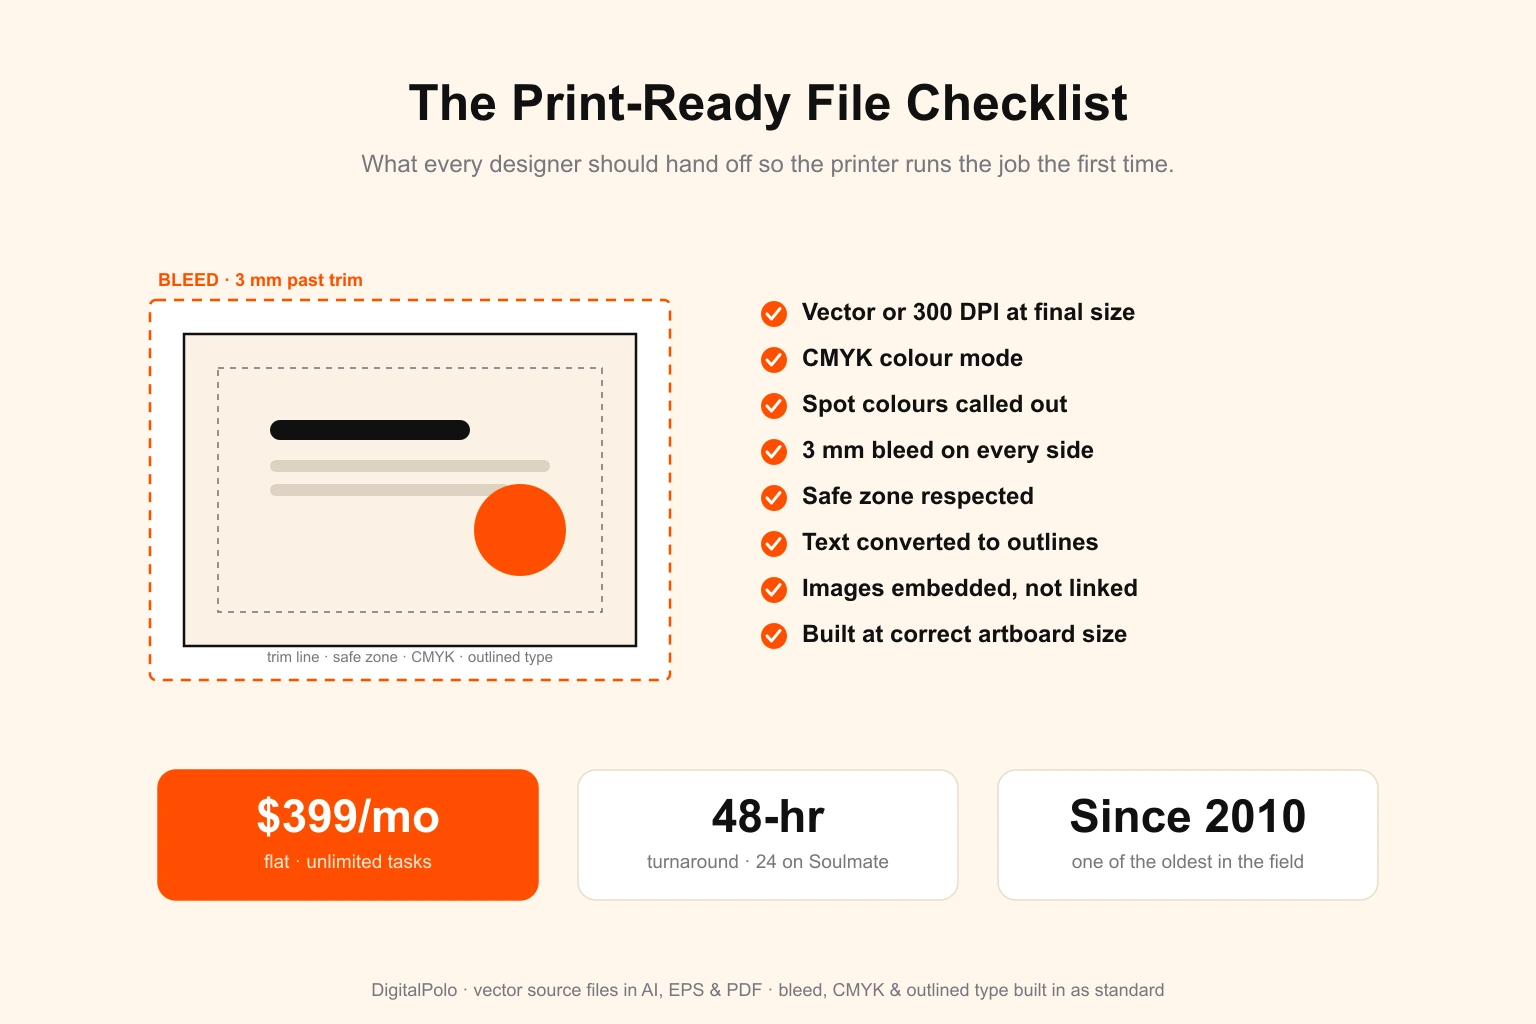
Whatever the system, the file needs the same production hygiene as any other large-format job: correct colour space with the printer's profile, embedded or outlined fonts, adequate resolution at final size, and the specific bleed the frame requires. Running every file through a print-ready preflight check before release is what stops a supplier's queries from eating the days you allowed for production, and it is why files built to production specification reach a printer once rather than three times.
Two file-level details cause more show-floor disappointment than any others.
Logos must be vector. A logo lifted from a website is a screen-resolution raster image. At business card size it passes. On a nine-foot backwall it is a smear, and no amount of upscaling repairs it. If you are collecting partner or customer logos to display, ask specifically for EPS, AI or SVG and say why — the distinction between vector and raster artwork is exactly the thing that decides whether a logo survives enlargement.
Brand colour will not match across substrates, and you should decide what to do about that before you see it. The same corporate blue printed on dye-sublimated fabric, on a vinyl banner and on a laminated rigid panel will land in three visibly different places, because the ink systems and the surfaces are different. Fabric in particular tends to read softer. The way to control it is to specify a target rather than hope: work from a defined conversion between spot and process colour, understand why the same colour behaves differently in CMYK and RGB, and request a hard proof on the actual substrate for the one or two surfaces where the colour genuinely matters. A soft proof on a screen tells you very little about how a colour will sit on fabric.
There is a third, quieter risk: fonts. A typeface licence that covers desktop use does not automatically cover a third party printing your artwork, and licences differ on this. If a print supplier needs your font files, check the licence before sending them — the same trap described in the guide to font licensing when work passes between parties. Outlining the type in the supplied file avoids the question entirely and is good practice regardless.
The three feet nobody designs for
Stand in a real booth and look at where your content actually is.
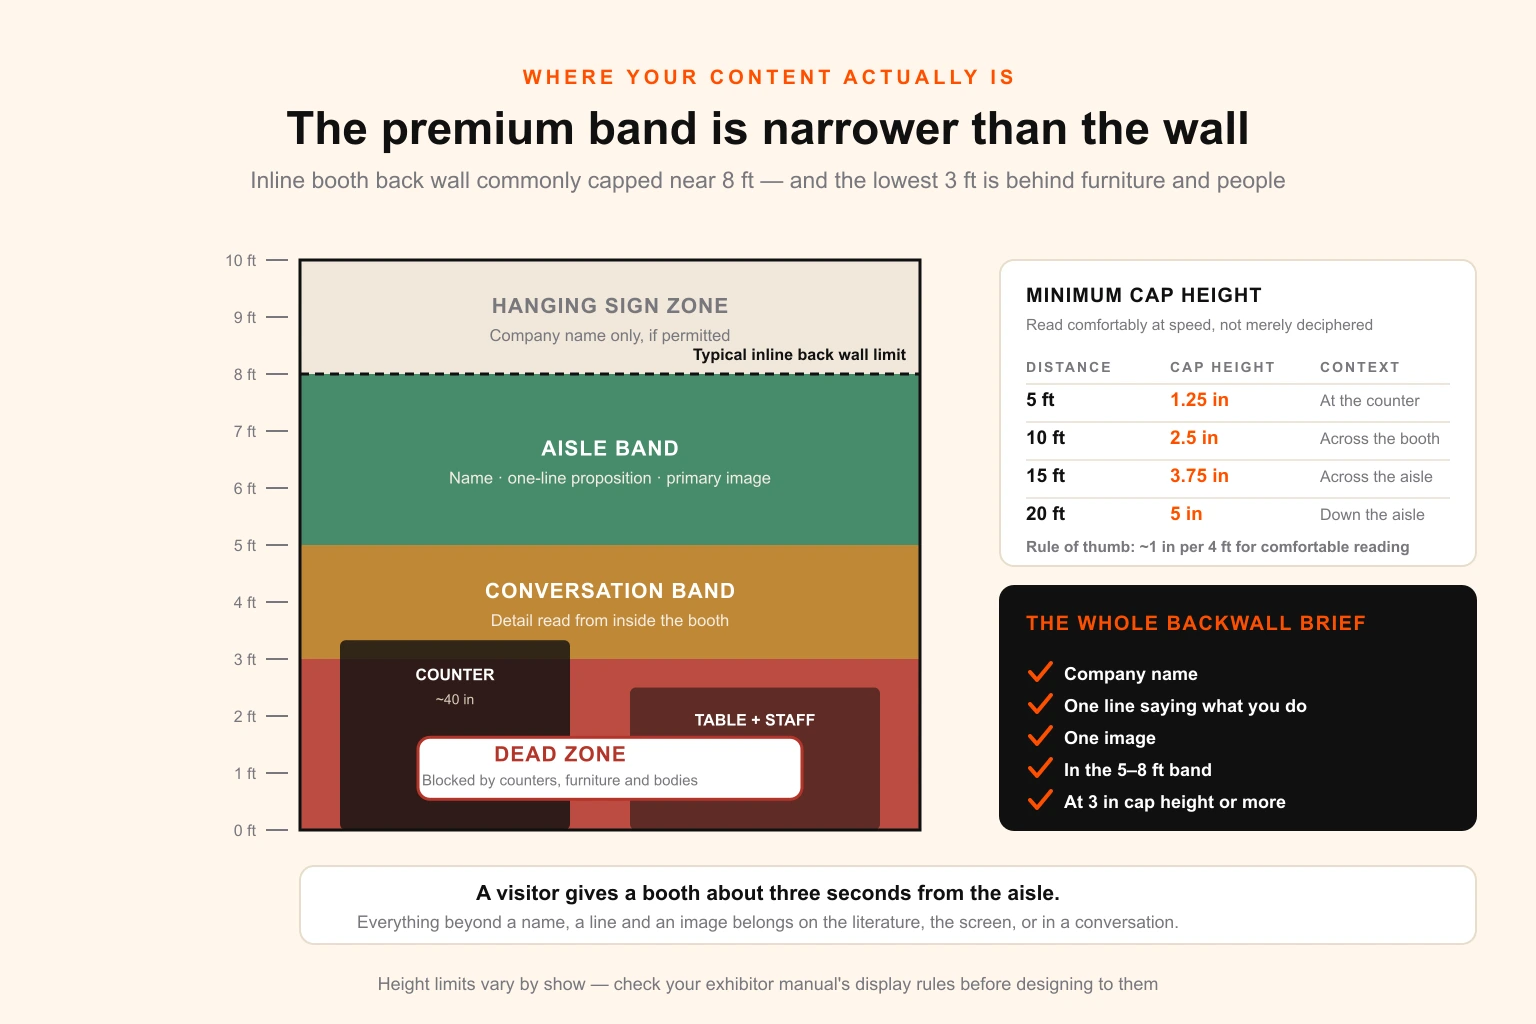
The bottom of every vertical surface is blocked. A counter is around forty inches high. A table is around thirty. Add a literature stack, a laptop, a bowl of sweets and two members of staff, and roughly the lowest three feet of your backwall is not visible to anyone in the aisle for the entire show. It was printed. It was paid for. It was proofed. Nobody read it.
Meanwhile the top of the wall is limited too. Most shows cap the back wall of an inline booth at around eight feet, and restrict the front portion of the space to a lower height so you do not block the booths beside you — the widely used industry display guidelines put the front five feet of an inline booth at a four-foot limit, and individual shows vary this. Your usable premium zone is therefore narrower than the wall: roughly the band between three and eight feet from the floor, and the top half of that band is what carries from the aisle.
That produces a straightforward hierarchy.
| Zone | Height from floor | What belongs there |
|---|---|---|
| Above the wall | 8 ft + | Hanging sign — company name only, if permitted |
| Aisle band | 5–8 ft | Company name, the one-line proposition, the primary image |
| Conversation band | 3–5 ft | Supporting detail read from inside the booth |
| Dead zone | 0–3 ft | Texture, colour, nothing that must be read |
The second half of the problem is size. A headline that reads perfectly on a laptop is being viewed in the hall from eight to twenty feet away by someone walking past at an angle. The rule of thumb used in signage is that legibility scales with distance, and the working figure most sign shops apply is roughly one inch of capital letter height for every ten feet of viewing distance as a minimum, with about one inch per four feet where you want the text to be read comfortably and at speed rather than merely deciphered.
For a booth that means a headline intended to stop someone from across a fifteen-foot aisle wants capital letters in the range of three to four inches, not the one-inch type that looks generous on a screen. The arithmetic is the same as for any sign, and it is worth running properly rather than guessing — the letter height and viewing distance guide explains the derivation, and the letter height calculator will give you a number for your specific aisle width in a few seconds.
Put those two constraints together and the design brief for a backwall becomes unusually clear, and unusually restrictive: a company name, one line saying what you do, one image, in the band between five and eight feet, at three inches of cap height or more. Almost every underperforming booth graphic fails because it tried to do more than that.
Resolution: the number that is wrong in both directions
Two opposite mistakes cost exhibitors money here, and the second is much more common than the first.
The first is insisting on 300 DPI at full size. A ten-foot backwall at 300 DPI is a file of several hundred megapixels that nothing will open, and the printer discards most of it. Three hundred is the standard for material held in the hand at about a foot. It is not a universal quality setting.
The second, and the expensive one, is specifying against the nominal viewing distance. A backwall's quoted viewing distance is ten feet or more, which if you take it literally produces a specification of around 30 DPI at final size. That figure is optically defensible and it will look cheap, for a simple reason: nobody stands where the specification assumed. The person deciding whether to talk to your sales team is at the counter, two or three feet away, reading the small print — and at that distance a 30 DPI graphic is visibly soft.
The rule that resolves both errors is to specify against the closest realistic approach, not the nominal one. For booth graphics that generally lands at 150 to 200 PPI at final size for anything a visitor can walk up to — backwalls, counter wraps, table graphics, spec panels — and lower only for the surfaces genuinely viewed at distance, such as a hanging sign.
You still do not build the file at full size. Build at a reduced scale with a proportionally higher resolution, which is arithmetically identical and produces a workable file: a 1:2 build at 400 DPI is 200 PPI at final size in a file a quarter of the area. Confirm the target with your printer, because dye sublimation onto fabric caps useful detail lower than a vinyl or rigid substrate does, so the headroom you are buying differs by surface.
Two things keep this honest. Vector artwork is resolution-independent, so logos, type and drawn shapes should stay vector all the way to output regardless of what the photography does — in practice, on a well-built booth graphic the only raster content is the imagery. And if a licensed photograph is a low-resolution file to begin with, no build method rescues it; check the source before designing a nine-foot wall around it.
The full derivation — the optical limit, the working multipliers, and a table of PPI targets by substrate and distance — is in the guide to large format print resolution and DPI, and the print resolution calculator will tell you whether a specific image holds up at a specific finished size before you build anything on top of it.
One licensing note while you are choosing imagery. A stock photograph licensed for web use is not automatically licensed for a nine-foot printed display or for merchandise, and print-run and physical-goods limits are exactly where standard licences tend to stop. The traps are set out in the guide to stock asset licensing across print runs and merchandise; the short version is to check the terms for display and merchandise use before the artwork is built around the image.
The reusable core and the show-specific skin
This is the highest-leverage design decision available to any company that exhibits more than once a year, and it is made at concept stage or not at all.
Split everything you produce into two categories.
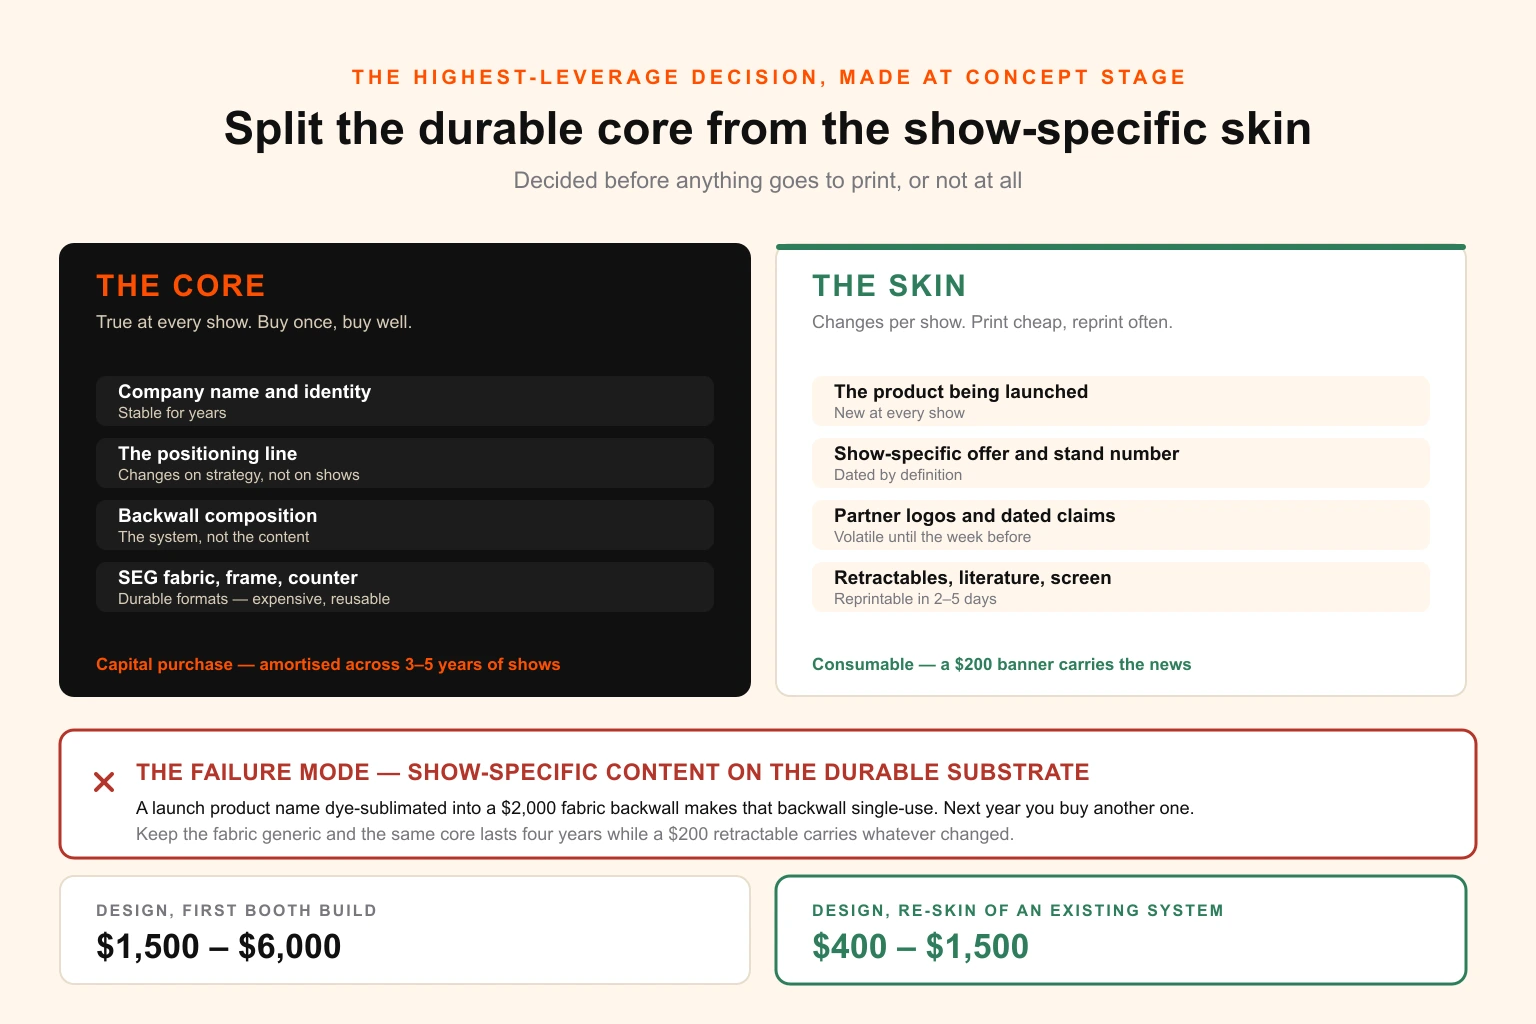
The core is what is true at every show: your company name, your positioning line, your identity, the visual system, the backwall's underlying composition. This should be produced once, produced well, and made from the expensive durable formats — SEG fabric, a good frame, a proper counter. It is a capital purchase amortised across three to five years of shows.
The skin is what changes per show: the specific product being launched, the show-specific offer, the stand number, the partner logos, the dated claims, the session times. This should live exclusively on the cheap reprintable formats — retractable banners, mural panels, literature, screen content.
The failure mode is putting show-specific content on the durable format. A launch product name dye-sublimated into a two-thousand-dollar fabric backwall means that backwall is single-use, and next year you buy another one. Keep the fabric generic and the same core lasts four years while a two-hundred-dollar banner carries the news.
There is a second-order version of this that matters for any company doing several shows a year: the booth is not a separate design project from the rest of your marketing. The same identity, the same photography and the same proposition are being rendered at booth scale, at email scale and at slide scale — which is the same problem as adapting one campaign concept across many channel formats, and it is solved the same way, by building a system with defined rules rather than a series of one-off files. If your brand guidelines already specify type scale, colour and logo behaviour, the booth is largely an application of an existing system rather than a fresh act of design, and the cost drops accordingly.
Two ownership details are worth confirming before you commission any of it, because they decide whether the core is genuinely reusable. First, that you will receive the editable source files and not only flattened print-ready PDFs — without them, next year's skin change means rebuilding from scratch, and the general problem of what a client actually owns after a design project is the same one. Second, that you know where the master files live. A booth designed by an agency that has since been replaced, with no source files handed over, is a booth that gets rebuilt at full cost. If you have never taken stock of what exists, the method in the guide to building a full asset inventory applies directly.
What it costs
Planning ranges for a 10x10 inline booth in the United States, for the graphics only. Space, travel, show services and staff time are all separate and all larger.
| Item | Typical range | Note |
|---|---|---|
| Backwall graphic only, existing frame | $400–$1,200 | Fabric usually more than mural panels |
| Backwall graphic + frame, new | $1,200–$3,500 | The frame is the durable purchase |
| Retractable banner incl. hardware | $150–$400 each | The cheapest thing to reprint |
| Table throw, printed | $150–$400 | Fabric, dye sublimated |
| Counter or podium wrap | $200–$500 | Vinyl on an existing counter |
| Literature, short run | $300–$900 | Depends heavily on quantity |
| Floor graphic | $150–$500 | If permitted |
| Hanging sign, fabric | $1,500–$5,000+ | Before rigging labour |
| Design, first booth build | $1,500–$6,000 | Every surface laid out from scratch |
| Design, re-skin of existing system | $400–$1,500 | Why the core/skin split pays |
Three things about that table are more useful than the numbers themselves.
Design is frequently the largest single line for a first booth, because a backwall, three banners, a table throw, a counter wrap, a one-pager and a screen loop are seven distinct layouts that all have to agree with each other. It is also the line that shrinks the most in year two, provided year one produced a system rather than seven files.
Rush production is the most avoidable cost on the list. Ordering inside a supplier's normal lead time and ordering inside a week are different prices for the same goods, and the premium is entirely a function of when the artwork was approved.
The show's own invoice will exceed the graphics invoice, often by several times, once drayage, electrical, labour and rigging are counted. This is worth knowing because it reframes the graphics budget: saving three hundred dollars on a backwall while missing a discount deadline on show services is a bad trade, and it is the trade first-time exhibitors most often make.
For companies exhibiting several times a year, the arithmetic that usually decides the sourcing question is volume rather than unit price. A show generates somewhere between fifteen and forty discrete design deliverables across the six groups above, and three or four shows a year turns that into a continuous production requirement rather than a project. That is the point at which a fixed monthly unlimited graphic design arrangement starts to cost less than commissioning each show separately — the full comparison of models sits in the graphic design pricing guide, and Digital Polo's own plans are on the pricing page.
If you are on the other side of this — a sign shop or print business producing booth graphics for exhibitor clients and absorbing their artwork problems yourself — the file-preparation burden described above is your margin leaking. The economics of that, and where the design work is best placed, are covered in print shop design pricing and in the white-label offer for printers.
The countdown
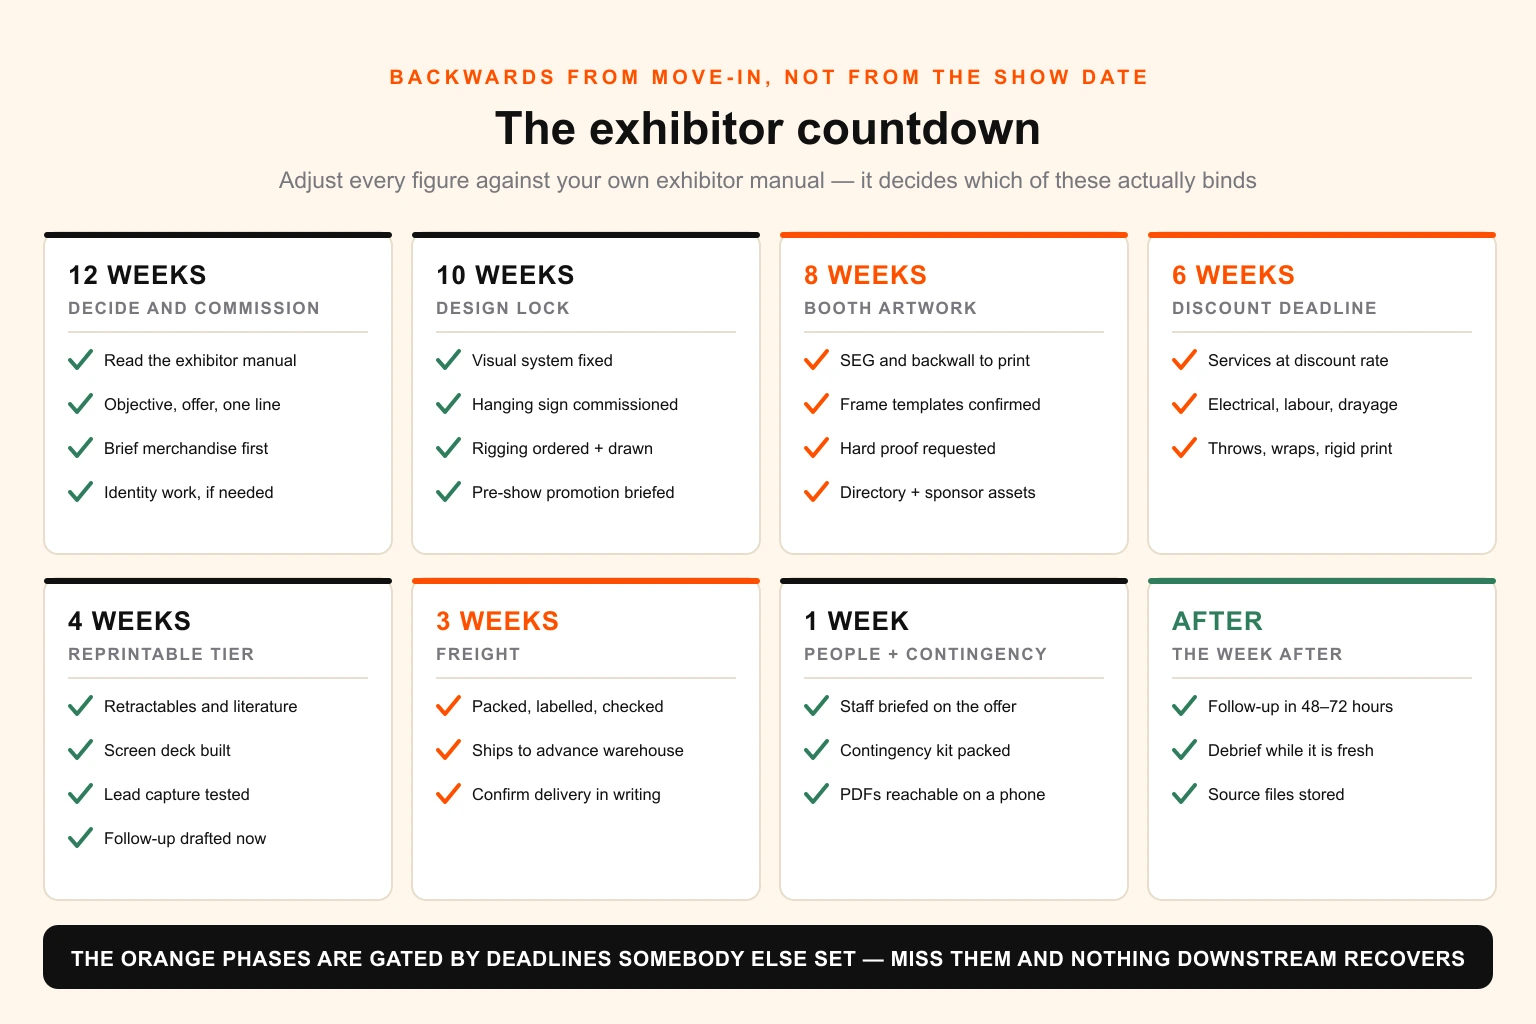
Built backwards from move-in day, not from the show date. Adjust every figure against your own exhibitor manual, which is the document that decides which of these is actually binding.
12 weeks out — decide and commission
Space booked and stand number known. Read the exhibitor manual and put its four deadlines in the calendar. Decide the objective, the offer and the one line the booth is going to say. If merchandise or apparel is in scope, brief it now — it is the longest lead time in the project. If the visual identity does not exist or is being changed, that work starts here and nothing else can start before it.
10 weeks out — design lock
The visual system for the show is fixed: the proposition, the hierarchy, the imagery, the layout of every surface. Hanging sign artwork and any custom fabrication are commissioned. Rigging is ordered and any required drawings submitted. Pre-show promotion is briefed alongside the booth, not after it — it needs to be in market before travel.
8 weeks out — booth artwork in production
Backwall and any SEG fabric go to print, because they are the longest lead time you can still influence. Frame templates confirmed against the actual hardware. A hard proof requested for whichever one or two surfaces genuinely need colour accuracy. Show directory and sponsor assets submitted, which usually have earlier deadlines than anything else.
6 weeks out — the discount deadline
Show services ordered at the discount rate: electrical, internet, furniture, carpet, cleaning, labour, material handling. This is the deadline with the clearest financial consequence and the one most often missed. Table throws, counter wraps and rigid panels go to print.
4 weeks out — the reprintable tier
Retractable banners, literature, business cards and any floor graphics go to print. Screen deck built. Lead capture method confirmed and tested. Pre-show email sequence live. Follow-up email and deck drafted now, while the offer is fresh and nobody is exhausted.
3 weeks out — freight
Everything is in hand, checked against the proof, packed and labelled. Freight ships to the advance warehouse in good time for its receiving window. Confirm delivery in writing rather than assuming it.
1 week out — people and contingency
Booth staff briefed: the offer, the qualifying questions, who does what and when. Contingency kit packed. Digital versions of every printed asset saved somewhere reachable from a phone, so a local reprint is possible if a crate goes missing.
Move-in day
Install, check the graphics for creases and alignment before the crew leaves, and photograph the finished booth in good light. Those photographs are next year's promotional assets and this year's recap post.
The week after
Follow-up out within forty-eight to seventy-two hours while you are still a specific memory rather than one of a hundred badges. Debrief while it is fresh: what worked, what nobody looked at, what to cut next year. Store the source files somewhere they will still be findable in eleven months.
What can be fixed on site, and what cannot
Knowing the difference is worth more on move-in day than any amount of planning, because it tells you where to spend a panicked hour.
Fixable in the hall, cheaply. Screen content and the looping deck. Anything printed on paper, if there is a print shop in the city and time to collect. Layout, furniture position, where the literature sits. Fabric creases, which usually drop out with a steamer or overnight.
Fixable at a price. A retractable banner or a flat rigid panel reprinted locally in a show city, if a supplier has capacity and you have the file. This is exactly why the contingency kit should include a folder of print-ready PDFs reachable from a phone.
Not fixable. SEG fabric, hanging signs, custom fabrication, merchandise. If the content on them is wrong, it is wrong for the whole show. This is the entire argument for keeping volatile content off those substrates, made concrete.
The contingency kit that repays its weight, every show:
- Print-ready PDFs of every asset, in cloud storage, reachable from a phone
- Gaffer tape, cable ties, scissors, a multi-tool
- A lint roller and a small steamer for fabric
- Spare frame parts — the specific ones your system breaks, which you will learn at show one
- Double-sided tape and adhesive strips rated for the surfaces you have
- A printed booth layout diagram for the installation crew
- Spare literature beyond your estimate, boxed separately so it is not opened until needed
- A paper lead-capture fallback for when the scanner fails
Mistakes worth naming
Scheduling from the show date instead of the warehouse cutoff. The single most common structural error, and it produces every other symptom on this list.
Reading the exhibitor manual three weeks out. By then the discount deadline has gone, the rigging deadline has gone, and the warehouse window is closing. Read it the week you book.
Designing the backwall at desk distance. Type that looks confident on a laptop is small in a hall. Print a section at full size and stand fifteen feet from it before approving anything.
Putting the important content in the bottom three feet. It is behind a counter and two people for four days.
Trying to say five things. A visitor gives a booth about three seconds from the aisle. A company name, one line and one image is the whole budget. Everything else belongs on the literature, the screen or a conversation.
Show-specific content on the durable substrate. A product name printed into fabric turns a multi-year asset into a single-use one.
A website logo on a nine-foot wall. Ask for vector, from your own team and from every partner whose logo you are displaying.
No follow-up built before travelling. The scanned badges are the entire return on the trip, and they decay fast.
Ignoring the show's own asset deadlines. The directory listing, the sponsor ad and the app profile all have their own specs and their own dates, usually earlier than everything else, and they are the assets most visible to attendees who never reach your booth.
Treating the booth as a one-off. If you exhibit annually, everything you make this year is either an investment in a system or a disposable expense, and which one it is was decided at concept stage.
The checklist, condensed
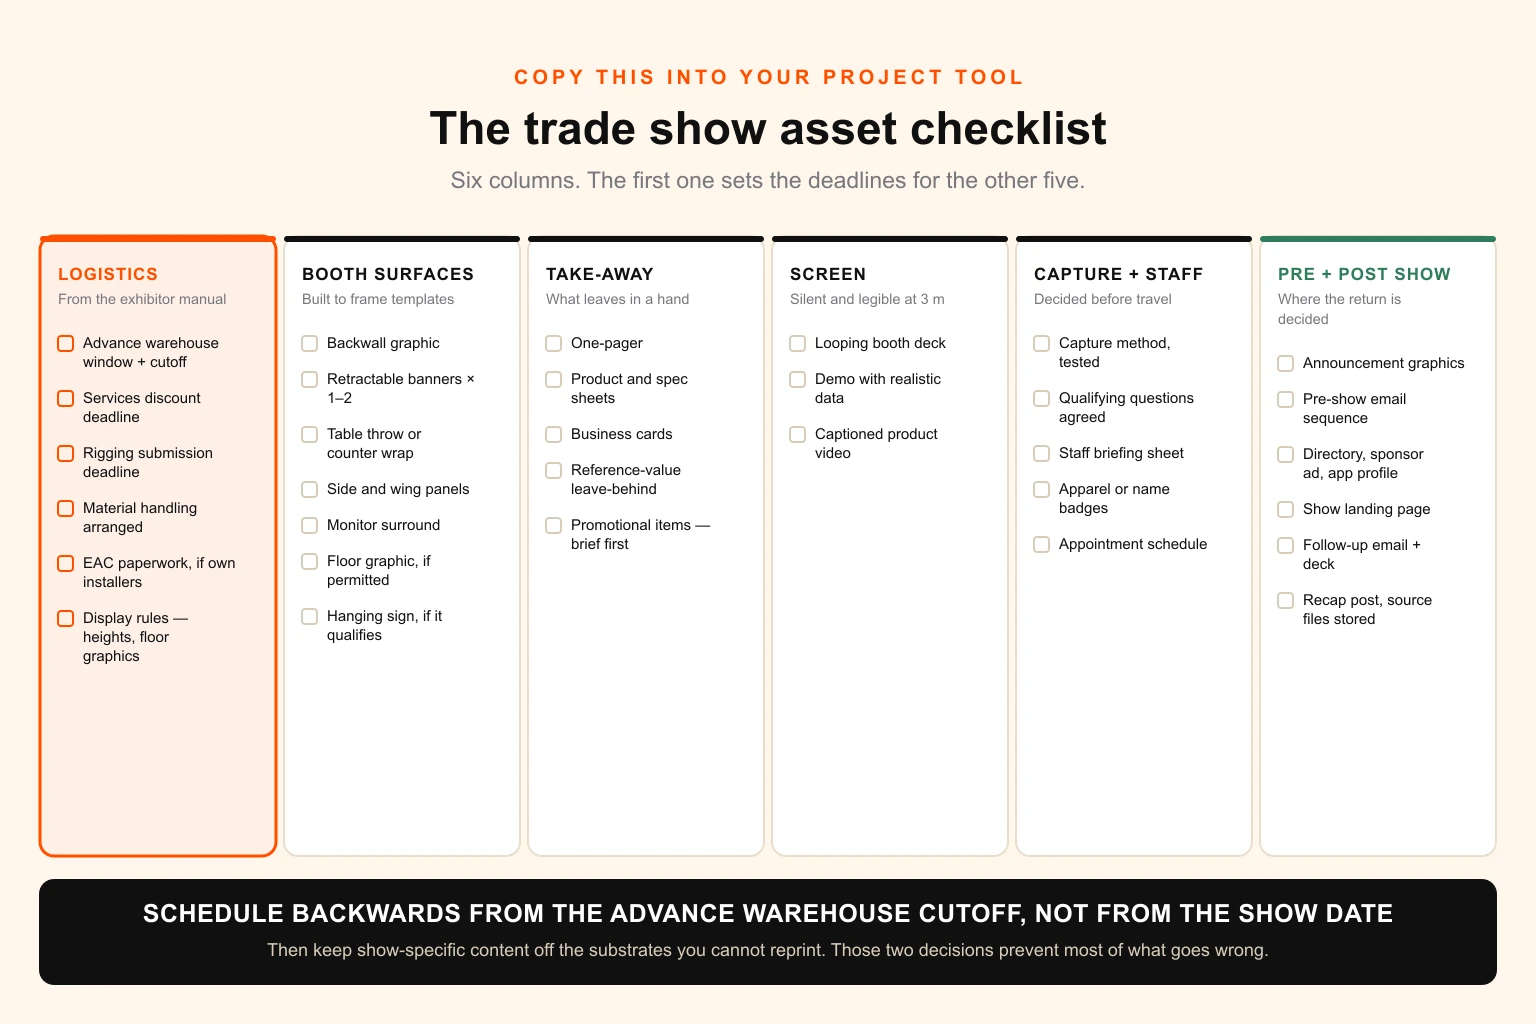
Copy this into your project tool.
Logistics — from the exhibitor manual
- Advance warehouse receiving window and final cutoff date
- Discount deadline for show services
- Rigging and hanging sign submission deadline, if applicable
- Material handling arranged and estimated
- Exhibitor-appointed contractor paperwork, if using your own installers
- Show display rules read — height limits, front-of-booth restrictions, floor graphic permission
Booth surfaces
- Backwall graphic, built to the manufacturer's frame template
- Retractable banners × 1–2
- Table throw or counter wrap
- Side or wing panels, if the frame has them
- Monitor surround, if a screen is in the booth
- Floor graphic, if permitted
- Hanging sign, if the booth type qualifies
Take-away
- One-pager
- Product or spec sheets
- Business cards
- A leave-behind with reference value
- Promotional items — briefed first, longest lead time
Screen
- Looping booth deck, silent and legible from three metres
- Demo environment with realistic data
- Product video, captioned
Lead capture and staff
- Capture method chosen and tested
- Qualifying questions agreed and written down
- Staff briefing sheet
- Branded apparel or name badges
- Appointment schedule
Pre-show
- Announcement graphics for email, social and site
- Pre-show email sequence with a booking link
- Show directory listing, sponsor ad and app profile, to their own deadlines
- Landing page for the QR code to point at
Post-show
- Follow-up email, written before travel
- Follow-up deck or proposal template
- Recap post
- Source files stored somewhere findable next year
Where this usually lands
The pattern is consistent enough to be worth stating plainly. A company's first show produces a booth that is slightly wrong in three or four specific ways — the headline too small, the important content too low, a product name printed into fabric that now cannot be reused, the follow-up sent eleven days late. None of those are expensive mistakes individually. Together they are most of the difference between a show that generates pipeline and a show that generates a folder of photographs.
Almost all of it is fixed by two decisions made early: schedule backwards from the advance warehouse cutoff rather than from the show date, and separate the durable core from the show-specific skin before anything goes to print.
The production work underneath is straightforward but there is a lot of it — fifteen to forty deliverables across six groups, each with its own dimensions, its own substrate and its own deadline, all of which have to look like the same company. That is a volume problem more than a creative one, and it is why exhibiting companies tend to move it onto a standing arrangement rather than commissioning each show as a project.
That is what Digital Polo does: a fixed monthly cost, unlimited requests, one queue for the booth graphics, the literature, the screen deck, the pre-show campaign and the follow-up sequence, with print-ready files built to production specification so they reach the printer once. If you are working towards a show date, the useful first step is to send the exhibitor manual and the frame templates along with the list above — the schedule tends to resolve itself once the real deadlines are visible, and the full service list covers where each of the six asset groups is handled.
If you are running the event rather than exhibiting at it, the organiser's version of this schedule — venue access, wayfinding, delegate badges, stage sets and sponsor recognition — is in the event production timeline.