

A new product goes live on Amazon on a Tuesday. By Thursday it has disappeared from search. The listing still exists and the stock is still in the warehouse, but the status in Seller Central now says Search Suppressed. The reason given is that the main image does not meet requirements. The seller opens the image, sees a white background and a well-lit product, and can't find anything wrong.
What's usually wrong is invisible. The background is RGB 251 rather than 255. Or there's a soft drop shadow the retoucher added to make the product look grounded. Or the product fills 78% of the frame because the photographer left room for a crop. None of these is obvious looking at the file, and Amazon's automated checks catch all of them.
It's expensive. A suppressed listing gets no search traffic, so any ad spend pointing at it is wasted. Organic ranking built over months starts to slip, and a launch timed around a promotion can miss its window while the seller works out what the problem is. On a catalogue of fifty or two hundred SKUs, a single bad image template can suppress dozens of listings at once.
Most published guides repeat the same list of rules. The list is correct, but it isn't enough to diagnose a problem, because an image can fail in four different places, and each one has different symptoms, causes and fixes. This guide covers:
- the full specification for main and additional images, in one table
- the category exceptions that override the general rules
- the four ways an image fails, and how to tell which one you have
- a pre-upload test that catches near-white backgrounds and underfilled frames
- the file naming convention for bulk uploads
- a slot-by-slot image plan, and what to send a designer to get it right first time
If you produce listing images for a large catalogue, or for clients, and want a design team that works to this spec without being reminded, see how the plans work. Everything below applies whoever makes the images.
The short answer: Amazon image specs at a glance
These are the requirements that apply to almost every product category. Category style guides can add to them, covered further down.
| Requirement | Main image | Additional images |
|---|---|---|
| File format | JPEG (preferred), TIFF, PNG, non-animated GIF | Same |
| Pixel size, longest side | 500 minimum, 10,000 maximum | Same |
| Zoom enabled | 1,000 px or more on the longest side | Same |
| Recommended delivery size | 2,000 × 2,000 px square | 2,000 × 2,000 px square |
| Colour mode | sRGB (CMYK accepted, but colour can shift) | sRGB |
| Background | Pure white, RGB 255, 255, 255 | Any, as long as the product is represented accurately |
| Product fill | About 85% of the frame | No fixed rule |
| Text, logos, graphics, badges | Not allowed | Allowed within limits (see below) |
| Props and accessories | Only what's included in the sale | Allowed for context, if not misleading |
| Photograph or render | Real photograph of the actual product | Photographs, accurate renders, infographics |
| Number of images | One main image required | Up to eight; Amazon recommends at least six plus a video |
Practical spec to give a designer or photographer: square, 2,000 × 2,000 pixels, sRGB JPEG saved at high quality, main image on pure 255 white with the product's longest dimension covering at least 85% of the canvas, named with the product identifier and variant code.
That spec clears every technical threshold with room to spare. Most rejections come from the policy layer rather than the file layer, and that's where the rest of this guide spends its time.
An image can fail in four different places
When a seller says "Amazon rejected my image", they can mean four quite different things. Working out which one happened is the fastest route to a fix, because each has its own symptom and a different cause.
1. The upload is rejected. The file never gets into Amazon's system. You see an error in the upload tool or a processing report, or you see nothing and the image never appears. The cause is almost always technical: wrong format, too small, a malformed file name in a bulk upload, the wrong product identifier, or a file that's corrupted or unusually encoded.
2. The upload is accepted, but your image isn't shown. Seller Central shows the upload as successful, but the detail page still shows an old image, or someone else's. There are two causes. Either processing hasn't finished, which can take from a few minutes to a day, or Amazon has several image contributions for the same ASIN and has chosen another one. On shared listings, contributions from the brand owner in Brand Registry generally get priority. A reseller's image can be overridden by the brand, and a brand's image can be overridden by a stronger contribution if the brand isn't registered.
3. The listing is suppressed. The image is live, then Amazon's checks decide the main image breaks policy and the listing is hidden from search. The status shows as search suppressed, often with a short reason such as a non-white background. This is policy failure, not file failure, and it's the one that costs the most, because the listing disappears while looking fine to the seller.
4. An image is removed later. A listing that has been fine for months loses an image or gets suppressed after a manual review, a customer complaint, a competitor report, an intellectual property claim or a policy update. Additional images get removed this way more often than main images, usually because of a badge, a claim or a trademark.
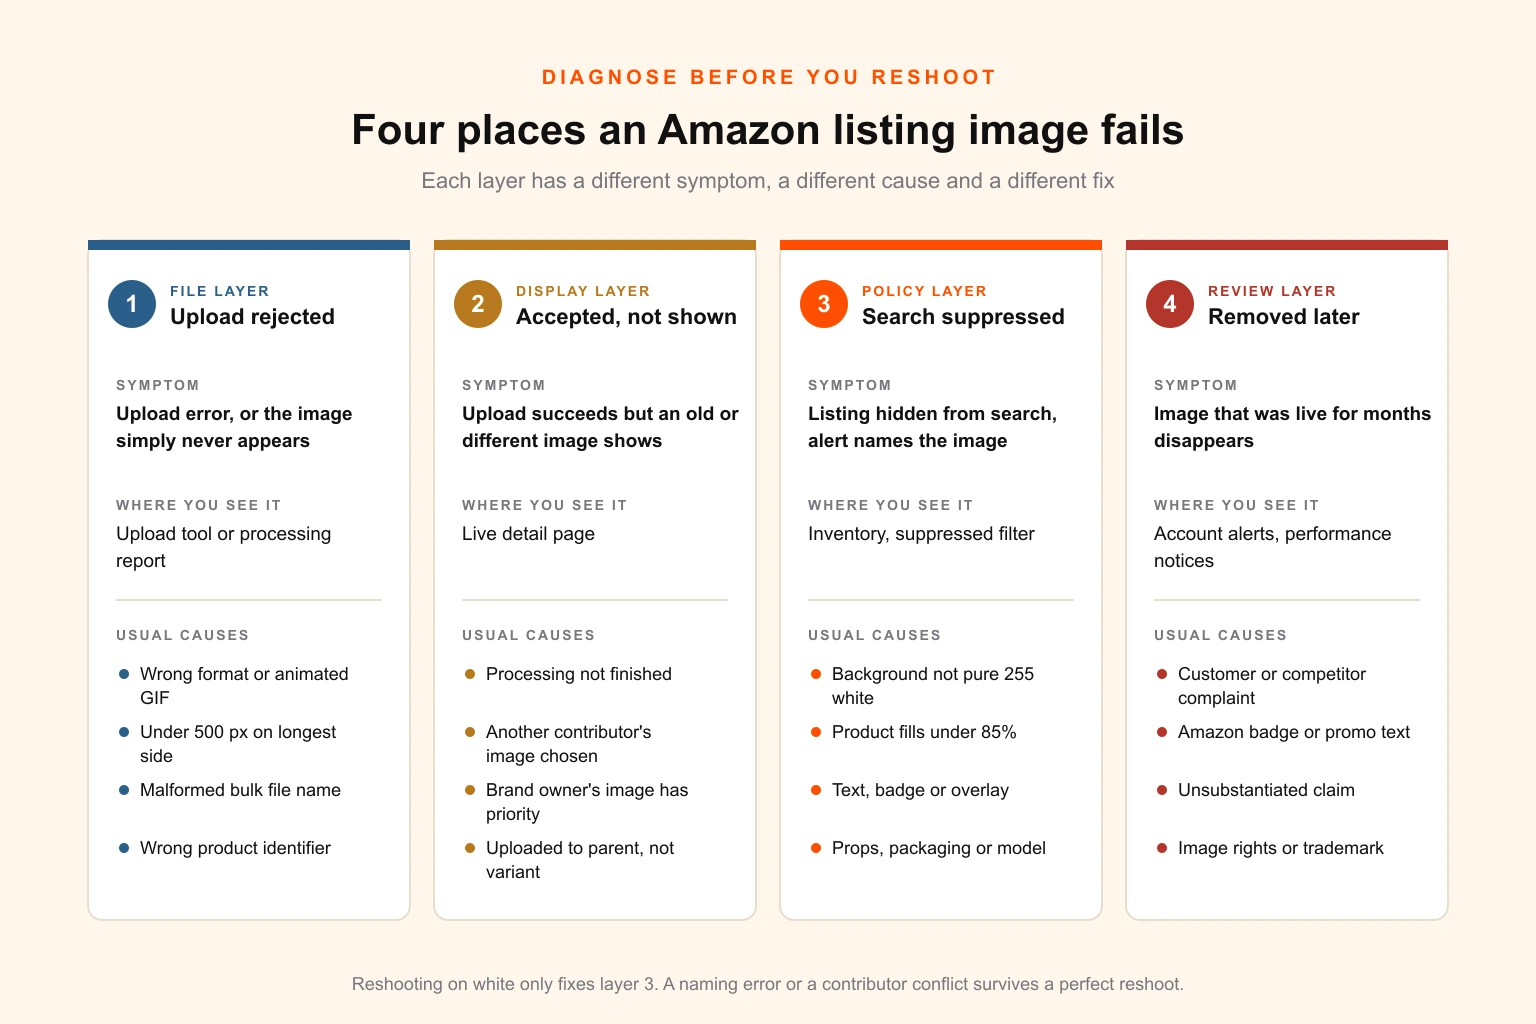
Diagnose the layer before changing the image. A naming error and a near-white background need completely different fixes.
The distinction matters because the standard advice, to reshoot on a white background, only fixes the third failure. If the problem is a malformed file name or a contribution conflict, a perfect reshoot uploaded the same way will fail the same way.
Main image requirements, rule by rule
The main image appears in search results, on the detail page and in ads, and it's the one Amazon polices most strictly. Here's each rule, what it means in practice, and where sellers usually get it wrong.
Pure white background, RGB 255, 255, 255
The background must be pure white on every channel. It isn't enough to look white. Studio shots lit on a white sweep typically land somewhere between 235 and 252, which reads as white on a monitor but isn't 255. Background removal tools sometimes leave a faint halo of the original background around the edge. JPEG compression adds its own off-white noise along high-contrast edges.
Natural contact shadows directly under the product are generally tolerated in practice. Drop shadows, reflections, graduated floors and vignettes are a common source of suppression, because they put large areas of non-white pixels in the frame.
The product fills about 85% of the frame
Amazon's guidance is that the product should occupy 85% or more of the image. The practical test that designers use is the longest dimension: on a 2,000 × 2,000 pixel canvas, the product's longest side should span at least 1,700 pixels. A tall, thin product like a bottle will fill the height and leave white space at the sides, which is fine.
Photographers underfill for a good reason. They leave room so the image can be cropped for other uses. The fix is to crop tighter for Amazon in post-production, not to reshoot.
The actual product, and only the product being sold
The main image has to be a photograph of the product the customer receives. That rules out:
- illustrations, drawings, mockups and 3D renders
- placeholder images such as "image coming soon"
- accessories, props or items that aren't included in the sale
- multiple views or angles of the same product in one image
- the product inside its packaging, unless the packaging is a meaningful part of the product
- a different colour or variant from the one the ASIN represents
That last one catches out variation families. If the listing is the navy version, a main image of the grey version is an image mismatch, whether or not anyone has noticed yet.
No text, logos, graphics or overlays
No text, logos, watermarks, borders, colour blocks, badges, inset images or graphic elements anywhere on the main image. The only lettering allowed is what's physically printed on the product or its label.
This includes the badges sellers most want to add: "Best Seller", "Amazon's Choice", "Premium quality", "Made in USA" roundels and review stars. None of them belong on a main image, and Amazon's own badges and logos aren't allowed on any listing image.
Fully in frame, clear and in focus
The product should be fully in frame and not cut off at the edges, except in categories where the style guide allows a crop. The image should be sharp, properly lit and free of pixelation or jagged edges. Low-resolution images upscaled to meet the pixel minimum are a quality problem even when they pass the technical check, because the zoom shows the damage.
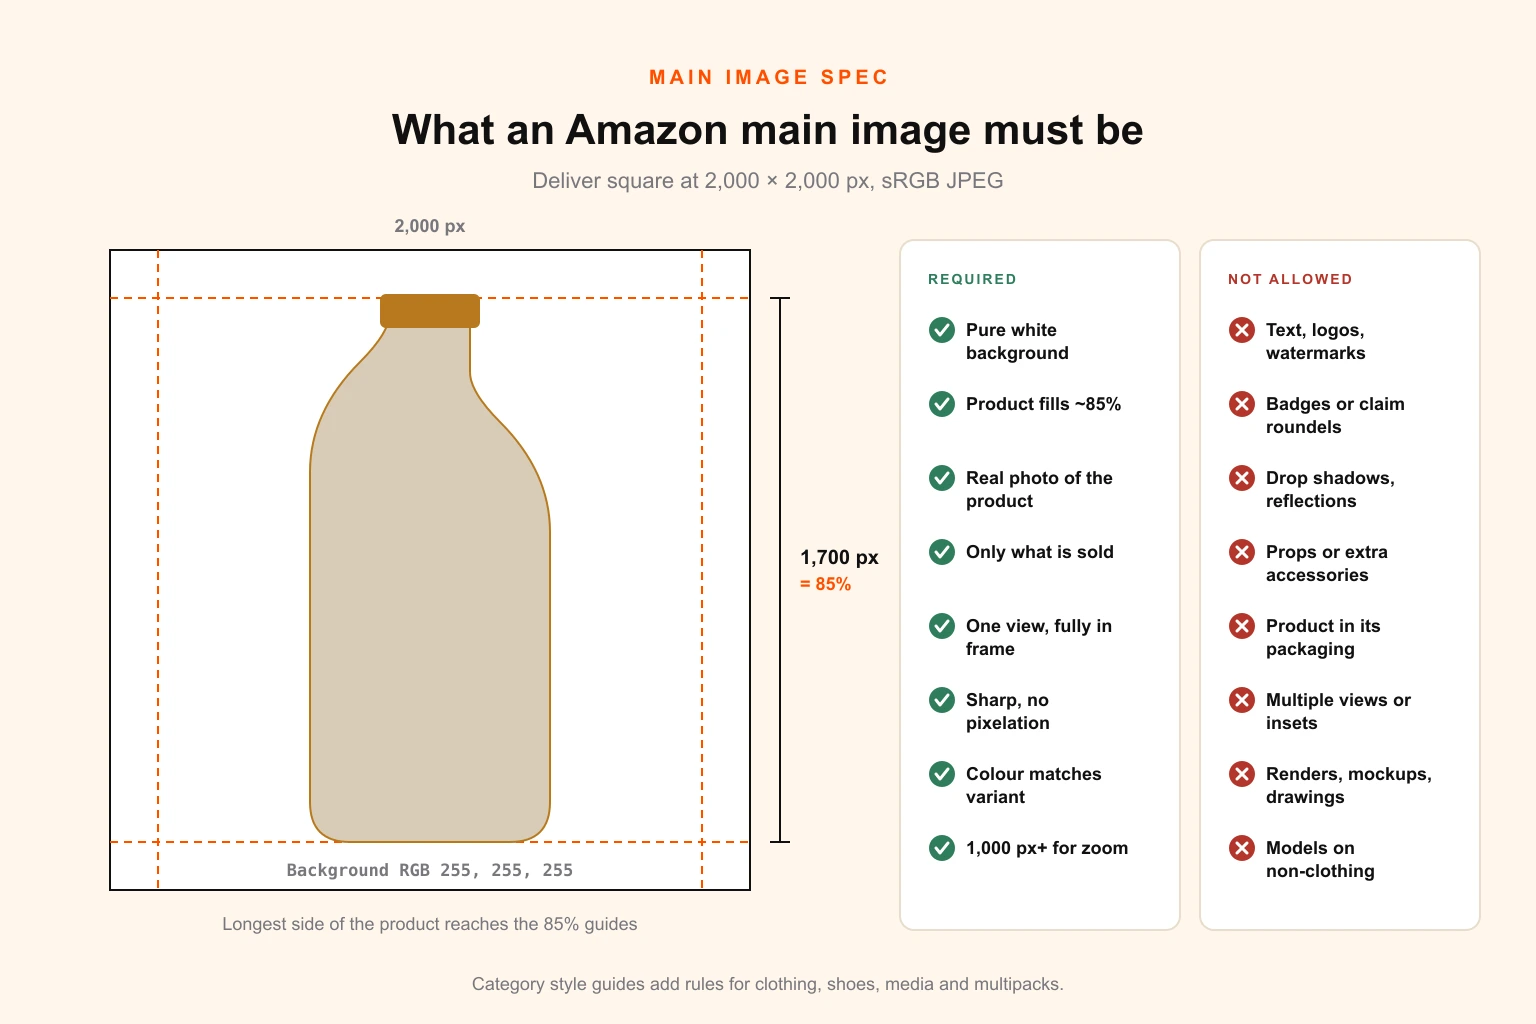
The main image spec on one page. Most suppressions come from the right-hand column.
Category exceptions that change the rules
Amazon's category style guides add to the general rules, and in a few categories they override them. These are the ones that cause the most confusion. Check the current style guide for your category before a shoot, because details change.
| Category | What changes for the main image |
|---|---|
| Adult clothing | Photographed on a standing human model or laid flat, depending on the category style guide. Visible mannequins are not allowed on the main image. |
| Kids and baby clothing | Photographed flat, off-model. A child model on a kids' clothing main image is a common suppression cause. |
| Shoes | A single shoe, generally facing left at about a 45-degree angle. |
| Books, music, video and DVD | The front cover or cover art, filling the frame. |
| Non-clothing products | Human models are generally not allowed on the main image. A person holding or using the product belongs in an additional image. |
| Multipacks and bundles | Show exactly what's included. A pack of three shows three units, and a single unit listing must not show several. |
| Jewellery and small items | Must still fill the frame. Small products shot at a natural scale are often underfilled. |
The model rule causes more arguments than any other. One seller's suppression notice, quoted on the Seller Central forums, said the main image "has a human model for a non-clothing product which is not permitted for this product type." Lifestyle photos showing someone using the product are useful. They belong in slots two to eight.
Additional image requirements (slots 2 to 9)
Additional images are where listings do their selling: benefits, scale, detail, use and proof. The rules are looser, but they're enforced, usually through removal of the image rather than suppression of the listing.
| Generally allowed | Commonly removed or flagged |
|---|---|
| Lifestyle photos of the product in use, including people | Amazon logos, trademarks or badges such as Best Seller or Amazon's Choice |
| Infographics with benefit callouts | Prices, discounts, "sale", coupon or free shipping messages |
| Dimension and scale diagrams | Seller contact details, website URLs, QR codes leading off Amazon |
| Close-ups of materials, texture and features | Health, medical or antimicrobial claims you can't substantiate |
| What's in the box | Named competitor brands in comparison charts |
| Comparison charts across your own range | Images of a different product, variant or colour |
| Accurate 3D renders, cutaways and exploded views | Offensive content, nudity or sexually suggestive imagery |
| Before and after images, where accurate | Unreadable text that misrepresents the product |
Two of these trip up otherwise careful sellers.
Regulated claims. Words like "antibacterial", "kills 99.9% of germs" or "repels mosquitoes" can bring a product under pesticide or medical device rules in the US. They cause problems in images as much as in bullet points. If the claim isn't in the product's approved documentation, don't put it in an infographic.
Comparison charts. A chart comparing your three sizes or models is useful and low risk. A chart naming a competitor's brand invites an intellectual property complaint, and even an accurate comparison can get the image removed. Compare against "typical alternatives" or your own previous model instead.
For text on additional images, design for a phone. Most Amazon shoppers see these images at thumbnail size before they tap in. A callout set in 20-point type on a 2,000-pixel canvas is unreadable at that size. As a working rule, headline callouts should be large enough to read when the image is scaled to about 400 pixels wide.
The actual reasons listings get rejected
This is the diagnostic table: the specific causes behind most image rejections, suppressions and removals, grouped by the four failure layers, with the fix for each.
| Symptom | Likely cause | Fix |
|---|---|---|
| Upload error or image never appears | Unsupported format, animated GIF, or file under 500 px | Re-export as JPEG, 2,000 px square |
| Bulk upload completes but nothing changes | File name malformed: spaces, dashes, wrong variant code or identifier | Rename to IDENTIFIER.VARIANT.jpg and re-upload |
| Image applied to the wrong product | Identifier in the file name belongs to another ASIN or variant | Check every identifier against the inventory report before upload |
| Upload accepted, old image still showing | Processing delay | Wait 24 to 48 hours before changing anything |
| Your image replaced by someone else's | Another contributor's image selected for a shared ASIN | Enrol in Brand Registry if you own the brand; open a case with evidence if the image is wrong |
| Colours look wrong on the detail page | CMYK file or unusual embedded colour profile | Convert to sRGB, embed the profile, re-export |
| Suppressed: non-white background | Background at 240 to 254, halo from background removal, compression noise | Threshold test at 255, clean the background, flatten onto a 255 white layer |
| Suppressed: background issue on a white-looking image | Drop shadow, reflection or vignette | Remove the added shadow; keep only a minimal contact shadow |
| Suppressed: product too small | Product fills well under 85% of the frame | Crop tighter so the longest side covers at least 85% of the canvas |
| Suppressed: text or graphics | Badge, logo, claim roundel, watermark or border | Remove all overlays; move the message to an additional image |
| Suppressed: model or mannequin | Model on a non-clothing product, child model on kids' clothing, visible mannequin | Reshoot or use a flat or ghost-mannequin image as the category allows |
| Suppressed: extra items | Props, unincluded accessories, or multiple units shown | Reshoot or retouch to show exactly what's sold |
| Suppressed: multiple views | Front and back, or several angles, in one main image | One view only; move the others to additional images |
| Additional image removed | Amazon badge, price or promo text, contact details, URL | Remove the element and resubmit |
| Additional image removed or listing flagged | Unsubstantiated health, pesticide or safety claim | Remove the claim or provide the required documentation |
| Image removed after a complaint | Competitor brand named, or photo you don't own the rights to | Remove the reference; use only images you've licensed for commercial use |
| Listing flagged as detail page mismatch | Image shows a different colour, size or model from the title and variation | Match the image to the exact variant, or fix the variation data |
The rights issue in the last rows deserves more attention than it gets. Manufacturer photos, stock images and photos lifted from another retailer can all trigger a takedown if you don't hold the rights. When you commission photography or design, make sure the agreement gives you commercial use in marketplaces. Our guide to stock asset licensing for print runs and merchandise covers how licence terms break down when an image moves into commercial use. The files and licences to secure before a designer leaves covers the ownership side.
How to test a main image before you upload it
Most suppressions can be caught in about two minutes before upload. This is the check a production designer runs on every main image.
Test 1: the threshold check for pure white
In Photoshop, add a Threshold adjustment layer and set the level to 255. Every pixel that's pure white stays white. Every pixel below 255, however close, turns black. A compliant background shows as solid white around the product. A near-white background shows as black, and halos, shadows and compression noise show up as grey or black fringes around the edges.
The same test works in the free browser editor Photopea, which has the same Threshold adjustment, and in GIMP under Colors, Threshold. For a single spot check, use the eyedropper or the Info panel on several background points and confirm every reading is 255, 255, 255. Sampling one point isn't enough, because backgrounds are rarely even.
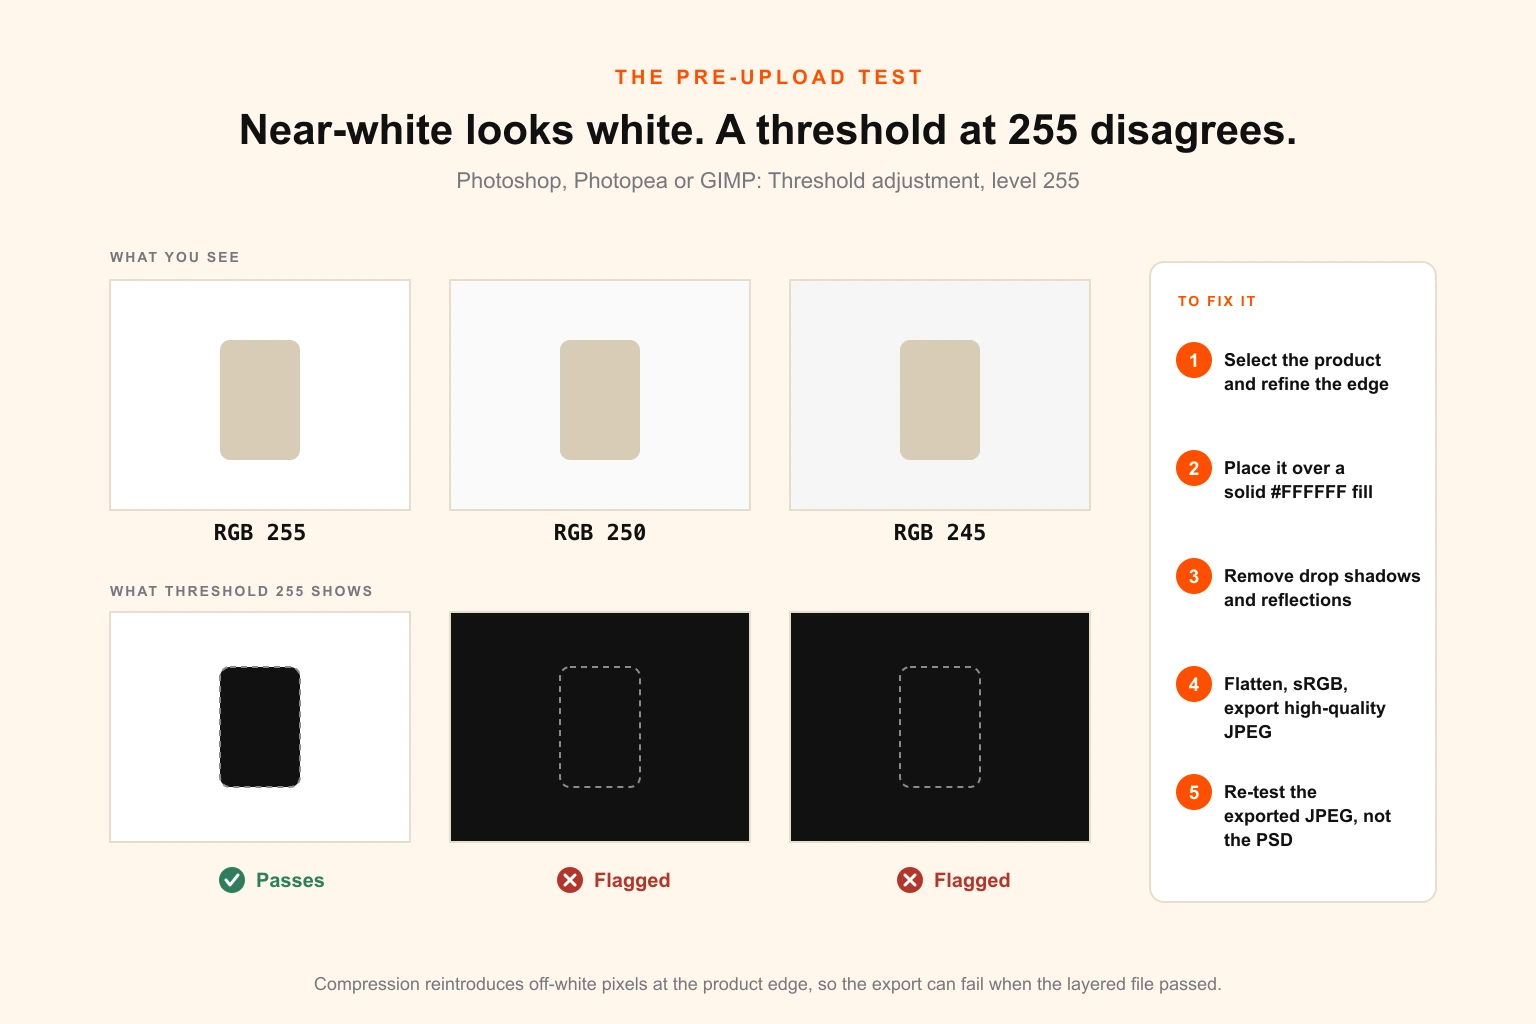
Near-white backgrounds are invisible to the eye and obvious to a threshold layer. That's why sellers keep saying their suppressed image "is white".
To fix a failing background:
- Select the product precisely, using Select Subject and then refining the edge by hand where needed.
- Put the product on its own layer over a solid fill layer of exactly #FFFFFF.
- Remove any drop shadow or reflection. If a contact shadow is needed, keep it small and directly under the product.
- Flatten, convert to sRGB, and export as a JPEG at high quality. Heavy compression brings the edge noise back.
- Run the threshold test again on the exported JPEG, not on the layered file.
That last step is the one people skip. A layered file can pass the test while the compressed export fails it.
Test 2: the 85% fill check
Set guides at 150 and 1,850 pixels on both axes of a 2,000-pixel canvas. The product's longest dimension should reach close to those guides on at least one axis. If there's clear white space between the product and the guides on every side, crop in.
Test 3: the one-product check
Look at the image as if you had never seen the product. Is anything in the frame that doesn't arrive in the box? Is there more than one view? Is there any lettering that isn't physically printed on the product? Does the colour match the variant name exactly? Each yes is a likely suppression.
Test 4: the file check
Confirm the format is JPEG, the colour profile is sRGB, the dimensions are 2,000 × 2,000, and the file name matches the naming convention if you're bulk uploading.
Amazon image file naming for bulk uploads
Uploading one image at a time through the listing editor doesn't need special file names. Bulk uploads through Seller Central's image upload tool do, and malformed names are one of the most common silent failures. The file goes up, and nothing changes because Amazon couldn't match it to a product.
The format is the product identifier, a period, the variant code, a period, and the file extension.
| Image | File name example |
|---|---|
| Main image | B0XXXXXXXX.MAIN.jpg |
| Additional image 1 | B0XXXXXXXX.PT01.jpg |
| Additional images 2 to 8 | B0XXXXXXXX.PT02.jpg to B0XXXXXXXX.PT08.jpg |
| Colour or pattern swatch | B0XXXXXXXX.SWCH.jpg |
The identifier can be an ASIN, UPC, EAN, JAN or ISBN. The rules that matter:
- no spaces, dashes, underscores or extra characters anywhere in the name
- variant codes in capitals exactly as shown, including the zero in PT01
- one identifier per file, and it must be the identifier of the exact variant, not the parent
- keep the extension lowercase and consistent
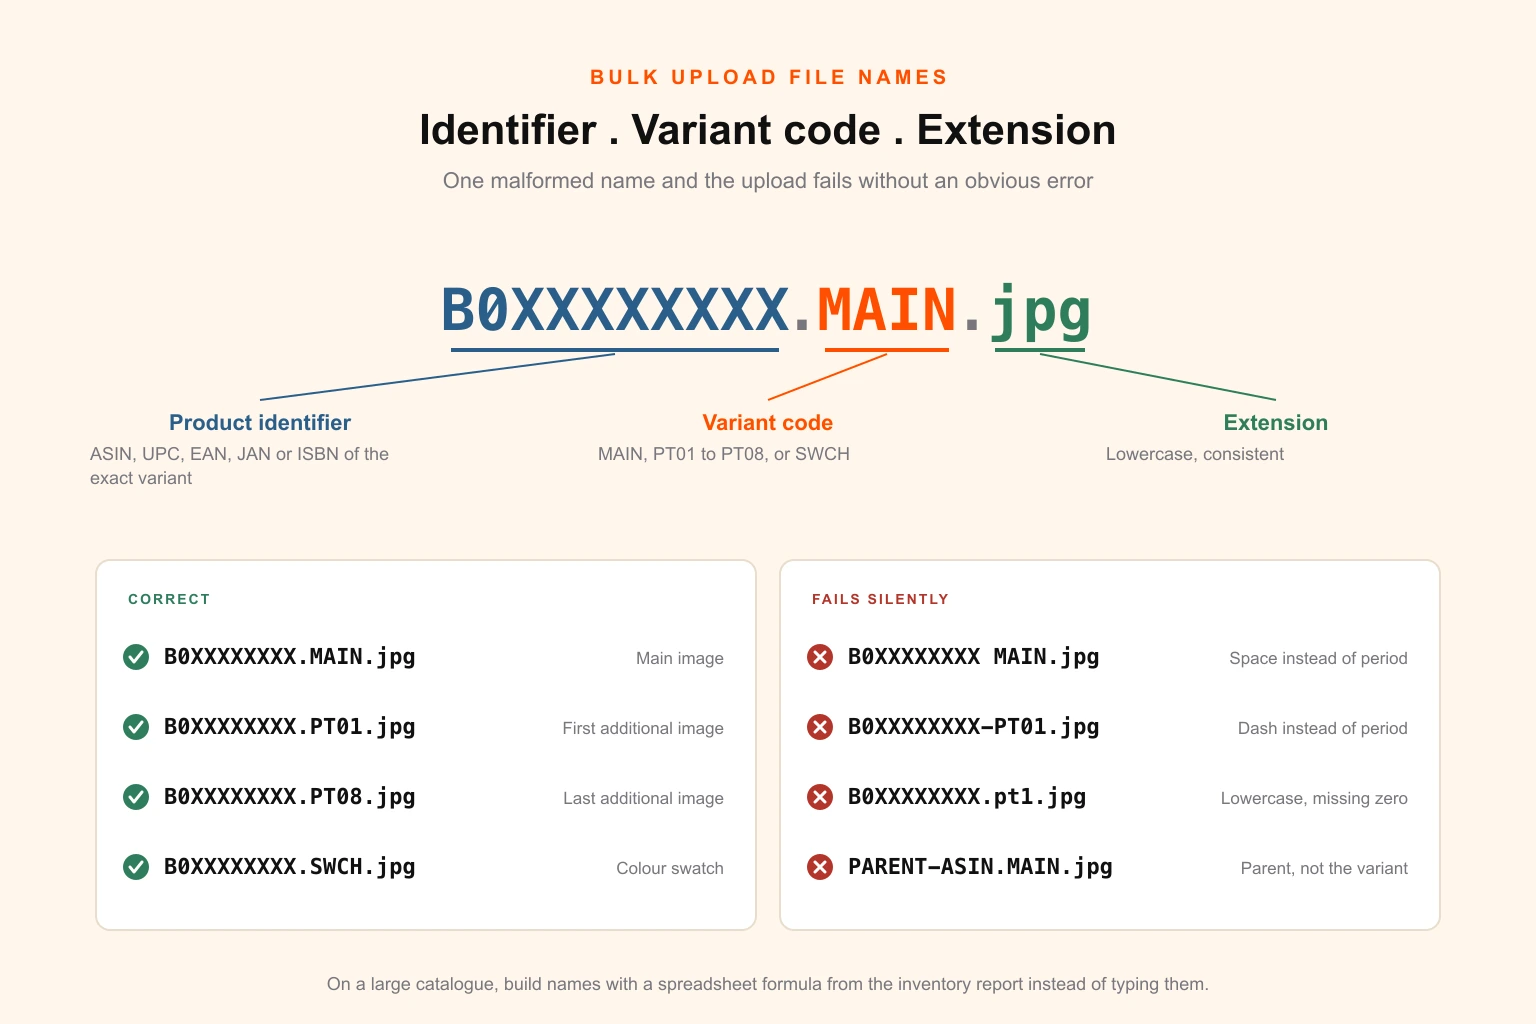
A bulk upload with one misplaced dash fails without an obvious error. Check names before you check the images.
On a large catalogue, generate the file names from the inventory report rather than typing them. A spreadsheet column that joins the identifier, a period and the variant code removes the most common error entirely. This is the same discipline the per-SKU asset inventory applies to the whole catalogue: every asset tied to a SKU, and named in a way a script can check.
A slot-by-slot image plan that sells, and stays compliant
Compliance keeps a listing visible. What goes in the other slots decides whether the visit converts. The plan below is a sound starting point for most physical products. Adjust the order for your category, but keep the principle: answer the questions a shopper would ask a salesperson, in the order they'd ask them.
| Slot | Image | Job it does | Compliance notes |
|---|---|---|---|
| 1 (MAIN) | Product on pure white | Earns the click in search | All main image rules apply |
| 2 (PT01) | Key benefits infographic | Answers "why this one?" | Claims must be substantiated |
| 3 (PT02) | Lifestyle, product in use | Shows scale and the result | People allowed here |
| 4 (PT03) | Dimensions and scale | Prevents "smaller than expected" returns | Measurements must be accurate |
| 5 (PT04) | Detail or material close-up | Proves quality | Real photo, not an idealised render |
| 6 (PT05) | What's in the box | Sets expectations | Only what actually ships |
| 7 (PT06) | Comparison across your range, or how it works | Helps choose the right variant | No named competitor brands |
| 8 (PT07) | Social proof, certification or care | Removes last objections | Only certifications you hold |
| Video | Demo or unboxing | Shows use in motion | Same claims rules as images |
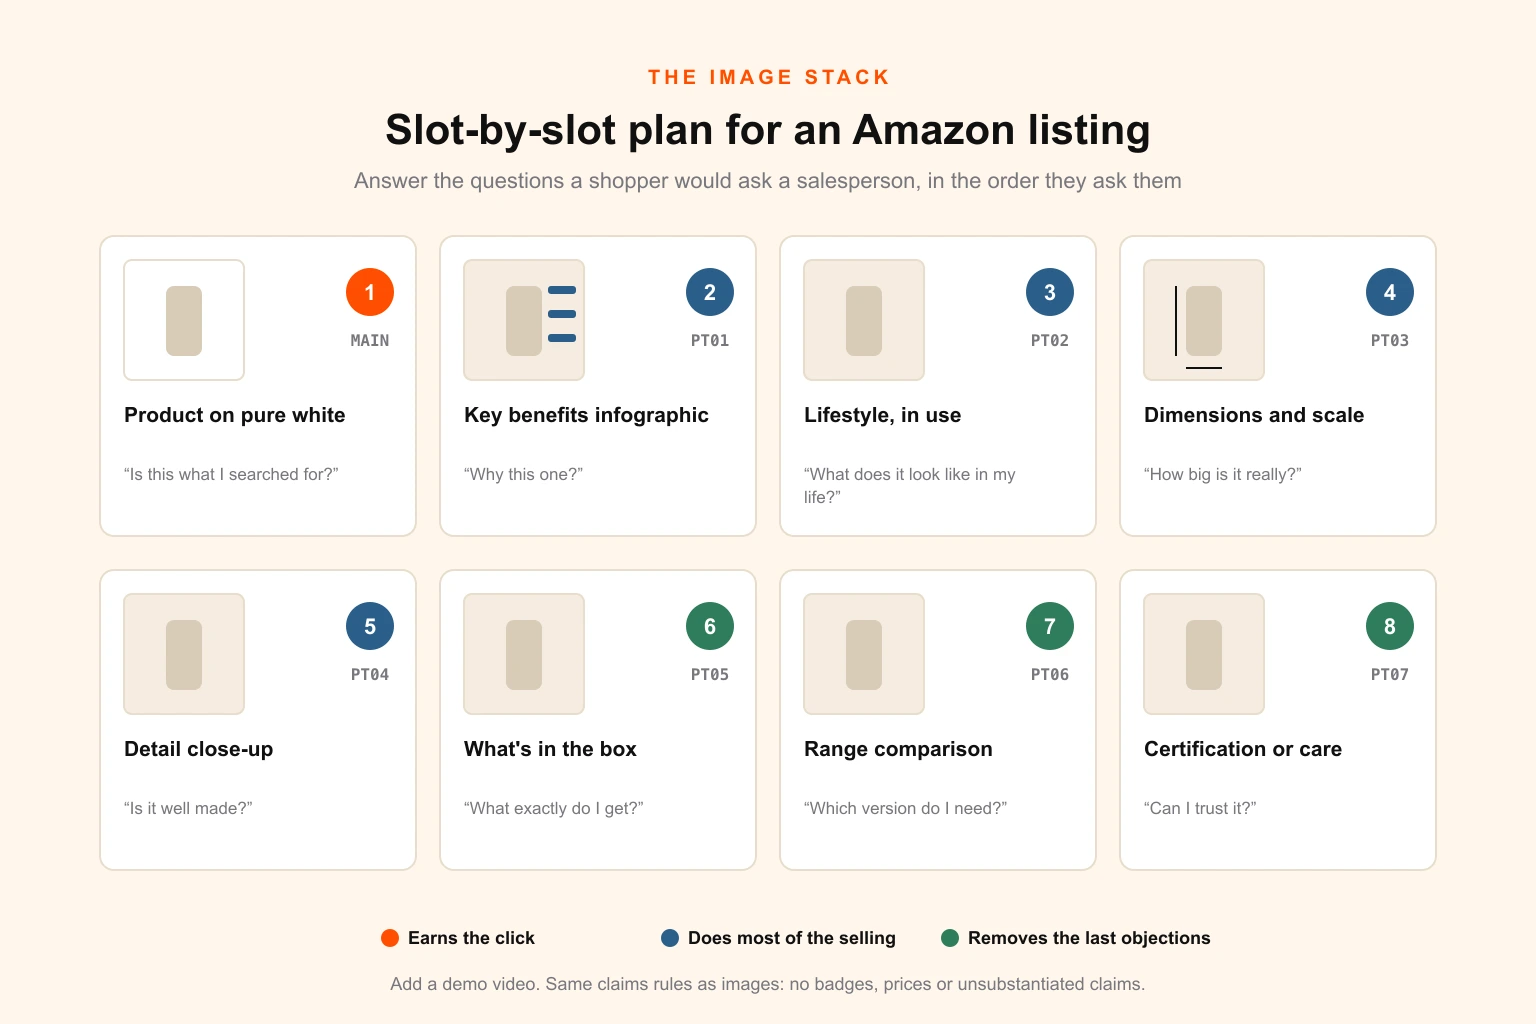
Slots two to five do most of the selling, because they're the ones shoppers see without scrolling on most devices.
The dimensions image is underrated. "Smaller than expected" and "not as described" are among the most common return reasons for physical products, and a clear dimension diagram with a familiar object for scale prevents a good share of them. It's also the image most often missing from listings built by a photographer alone, because it's a design job rather than a photography job.
Treat the image set as a system rather than eight separate commissions. Build one infographic template with fixed type sizes, callout styles and brand colours, and apply it across the catalogue. New SKUs then become production work instead of new creative, which is faster, cheaper and more consistent. The approach is the same one covered in turning one campaign asset into 15 channel formats: approve the master, then produce the derivatives.
If you're producing listing images at catalogue scale, a steady design team is usually cheaper than commissioning them job by job. Unlimited graphic design for e-commerce brands sets out how that works for Amazon, Shopify and DTC sellers. For agencies producing listings for clients, white-label graphic design delivers the same output under your name.
How to find and fix a suppressed listing
When a listing is suppressed, work through it in this order.
1. Find every affected listing. In Seller Central, open the inventory management page and filter by the search-suppressed status. Amazon's listing-quality tools also flag image problems, sometimes before a listing is suppressed. Menu names change periodically, so if a filter moves, search Seller Central Help for "suppressed listings". On a large catalogue, check whether the suppressed listings share a photographer, a template or an upload batch. They usually do.
2. Read the stated reason, then diagnose the layer. The alert usually names a category of problem, such as the background or text on the image. Treat it as a pointer rather than a full diagnosis, and run the four pre-upload tests on the live image. Automated detection is broad, and the named reason isn't always the only problem.
3. Fix the source file, not just the export. Correct the layered master so the next export, the next variant and the next marketplace don't bring the problem back.
4. Re-upload and verify. Upload the corrected image, then wait. Processing can take up to a day or so. Don't upload several versions in quick succession, because it becomes impossible to tell which one Amazon evaluated.
5. Escalate if a compliant image stays suppressed. If the image passes every test and the listing is still suppressed after 48 hours, open a case with Seller Support, or through Brand Registry's reporting tools if you're the brand owner. Attach the image and say specifically what you checked: background at 255 confirmed with a threshold test, product fill measured, no overlays. Specific cases get resolved faster than "my image is compliant".
6. Prevent the next one. Add the tests to your image sign-off checklist, and update the template or retouching instructions that caused the problem.
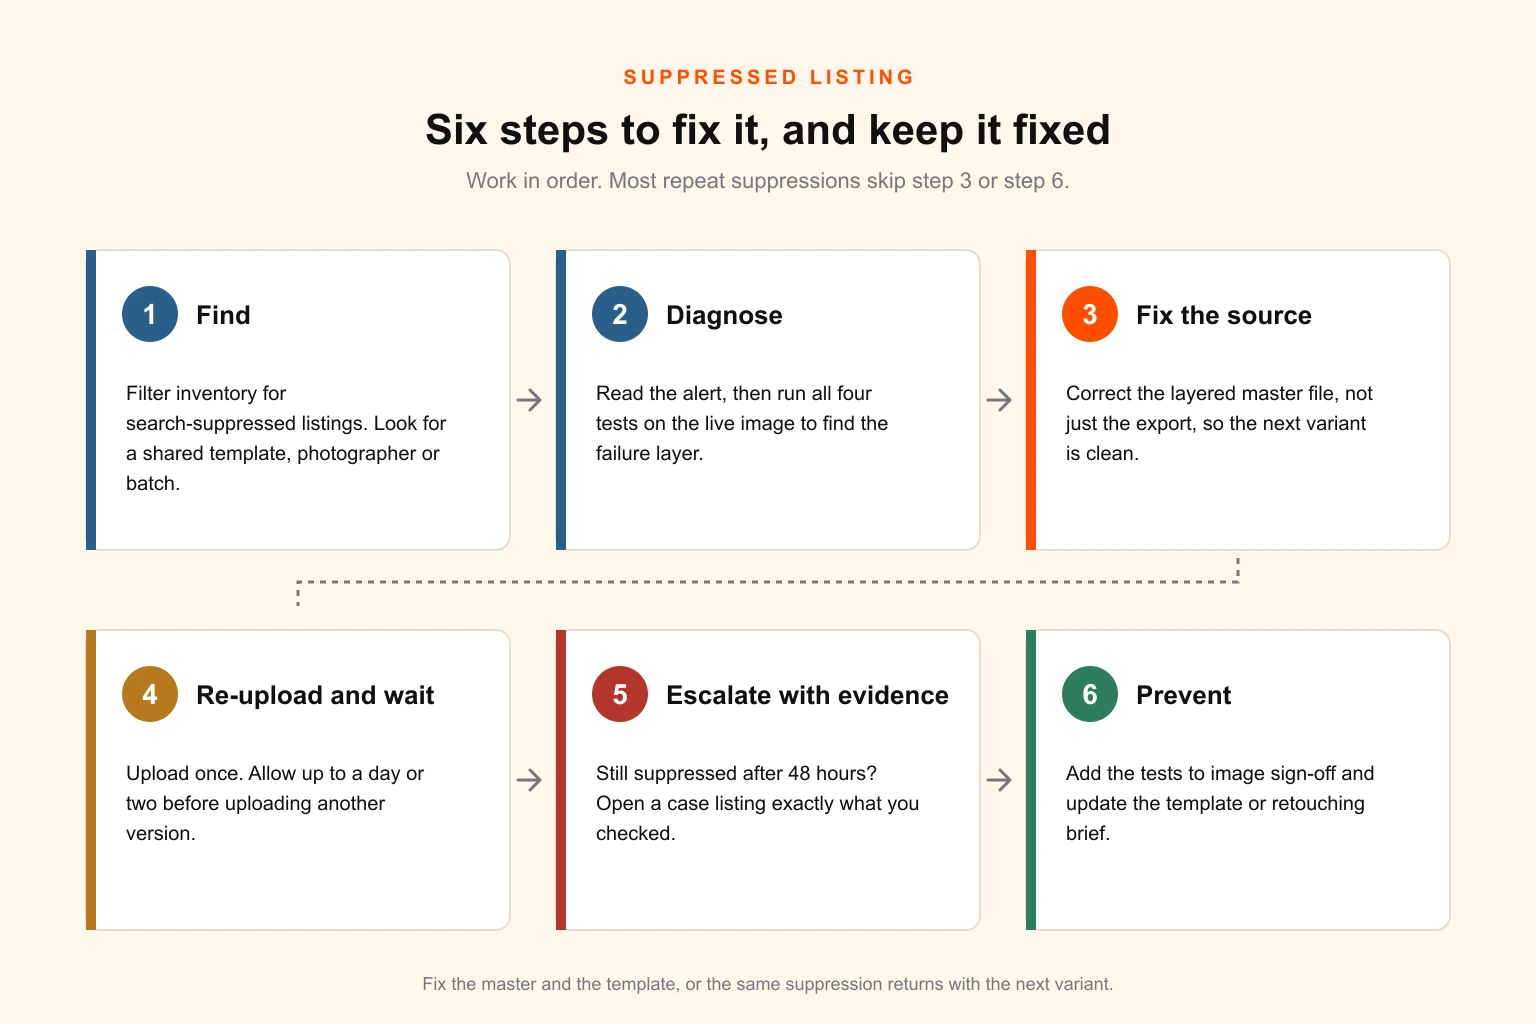
Fix the master file and the template, or the same suppression comes back with the next variant.
What to send a designer or photographer
Most image rejections trace back to a brief that described the look but not the spec. A photographer who wasn't told about the 85% rule leaves room to crop. A retoucher who wasn't told about pure white adds a soft shadow because it looks better. A designer who wasn't given approved claims writes persuasive ones.
A complete brief for Amazon listing images includes:
- Product identifiers: the ASIN or other identifier for every product and variant, from the inventory report
- Category: so the category style guide can be checked for model, mannequin and crop rules
- Source material: product photos or samples, with any existing photography licences
- Slot plan: what each additional image should show, using the table above as a starting point
- Approved copy and claims: exact wording for callouts, checked against product documentation
- Brand system: fonts, colours, logo files and any existing listing templates
- Output spec: 2,000 × 2,000 px, sRGB JPEG at high quality, main image on pure 255 white, product longest side at least 85% of canvas
- File naming: identifier plus variant code, in the bulk upload format
- Deliverables: exported images plus layered source files, so future fixes don't need a rebuild
- Marketplaces: which countries, so text can be localised and claims checked per market
For the general structure of a good brief, see how to write a graphic design brief that gets results the first time. If a design partner is producing listing images across a catalogue, infographic design and packaging design are closely linked, because the packaging artwork is often the source for callouts, colours and the product's printed labels. For planning, design turnaround benchmarks by asset type shows how long a listing set realistically takes once feedback rounds are included.
Common mistakes that cause repeat rejections
Retouching for looks, not compliance. Soft shadows, gradients and reflections look more premium and get listings suppressed. Keep premium styling for the additional images.
Testing the layered file instead of the export. JPEG compression reintroduces off-white pixels. Test the file you upload.
Using one image for every variant. A grey product image on the navy variant is an image mismatch, and customers who receive the wrong colour return it.
Putting the key message on the main image. "Pack of 3" or "BPA free" in a roundel on the main image is the most common text violation. Put it in the title and in slot two.
Saving in CMYK because the files came from the packaging printer. Packaging artwork is often supplied in CMYK. Convert listing exports to sRGB. CMYK vs RGB explained covers why colours shift when a print file goes on screen.
Naming files by hand on a large catalogue. Generate names from the inventory report. One typo means one silent failure.
Treating the dimensions image as optional. It's one of the cheapest ways to reduce size-related returns.
Uploading someone else's photos. Manufacturer images and stock photos without commercial rights invite takedowns. Keep the licence records.
Reusing marketing claims across marketplaces. A claim that's fine in one country can be regulated in another.
Tools that make compliant listing images faster
| Task | Tools |
|---|---|
| Background clean-up and retouching | Adobe Photoshop, Photopea (free, in the browser), GIMP |
| Background removal as a first pass | Photoshop Remove Background, remove.bg (always refine and threshold-test the result) |
| Batch colour conversion and export | Photoshop actions, Adobe Lightroom, Affinity Photo |
| Checking pure white | Threshold adjustment at 255, eyedropper or Info panel |
| Infographic templates | Figma, Adobe Illustrator, Photoshop with linked smart objects |
| File naming at scale | A spreadsheet formula built from the inventory report |
| Finding suppressed listings | Seller Central inventory filters and listing-quality tools |
Automated background removal is a good first pass and an unreliable last one. It routinely leaves faint halos and semi-transparent edge pixels that fail the threshold test. Budget time for a manual edge check on every main image.
KPIs to track for listing images
| Metric | Where to find it | What it tells you |
|---|---|---|
| Search suppressed ASINs | Seller Central inventory, suppressed filter | Direct compliance failures; target zero |
| Share of listings with seven or more images | Your catalogue audit | Whether listings use the slots available |
| Unit session percentage | Business Reports, by child ASIN | Conversion rate; the best test of a new image set |
| Search click share | Brand Analytics Search Query Performance (Brand Registry) | Whether the main image earns clicks against competitors |
| Size and "not as described" returns | Return reports and Voice of the Customer | Whether images set accurate expectations |
| Time from suppression to fix | Your own log | How quickly your team diagnoses and resolves image issues |
When you change an image set, change one thing at a time where possible and compare unit session percentage over a period long enough to smooth out promotions and seasonality. Brand Registry owners can use Amazon's Manage Your Experiments tool to test main images and other listing content directly.
Next steps
- Export a list of every active ASIN and filter for suppressed listings today.
- Run the threshold and fill tests on the main images of your top twenty sellers, even if they aren't suppressed. Detection rules tighten, and they're the listings you can least afford to lose.
- Check that every listing has a dimensions image and a what's-in-the-box image.
- Write the output spec and naming convention into your design and photography briefs.
- Build one infographic template, approve it, and roll it across the catalogue.
- Track unit session percentage before and after each image change.
Where Digital Polo fits
Digital Polo is a flat-rate design team. E-commerce brands and agencies use us to produce listing images, infographics, A+ content and packaging-derived assets across whole catalogues, to a written spec and with layered source files included. For a broader view of what the model involves, see how unlimited graphic design works and the complete guide to e-commerce branding.
Beyond listings, the same team handles print-ready packaging and labels, social media design for launches, and ad creative. How many ad creatives you need per month covers that side.
The short version
- Deliver every Amazon image at 2,000 × 2,000 px, sRGB JPEG.
- The main image needs pure 255 white, about 85% fill, one real product, and no text, props, packaging or badges.
- Category rules for clothing, shoes, media and models override the general ones.
- Images fail in four places: upload, display, suppression and later removal. Diagnose which before you reshoot.
- Test the exported JPEG with a threshold at 255 before upload.
- Name bulk upload files as identifier, period, variant code, period, extension.
- Use slots two to eight for benefits, scale, detail, contents and range comparison, without badges, prices or unsubstantiated claims.
If you need listing images produced to this spec across a catalogue, see what the plans include or talk to us about your workload.