If you run a sticker business — custom orders, e-commerce, branded merch, or wholesale runs for clients — the file your designer hands back determines whether your printer accepts the job, rejects it, or quietly re-renders something that comes back looking wrong on the press. The gap between "looks good in Canva" and "prints clean at 300 DPI with a proper cut path and 3 mm bleed" is where most sticker businesses lose hours every week.
This guide is the practical playbook. What a real print-ready sticker file actually contains, the design differences between die-cut, kiss-cut, and sheet stickers, how to brief a designer so the file is right the first time, and the realistic options for outsourcing design at the volume sticker businesses actually need.
DigitalPolo has been delivering unlimited graphic design since 2010 — one of the oldest services in the category — with plans from $399/month, 48-hour turnaround, unlimited revisions, and print-ready vector source files (AI, EPS, PDF) included as standard. That last detail is the one most subscriptions skip and it is the one sticker businesses cannot do without.
What "Print-Ready" Actually Means for Sticker Artwork
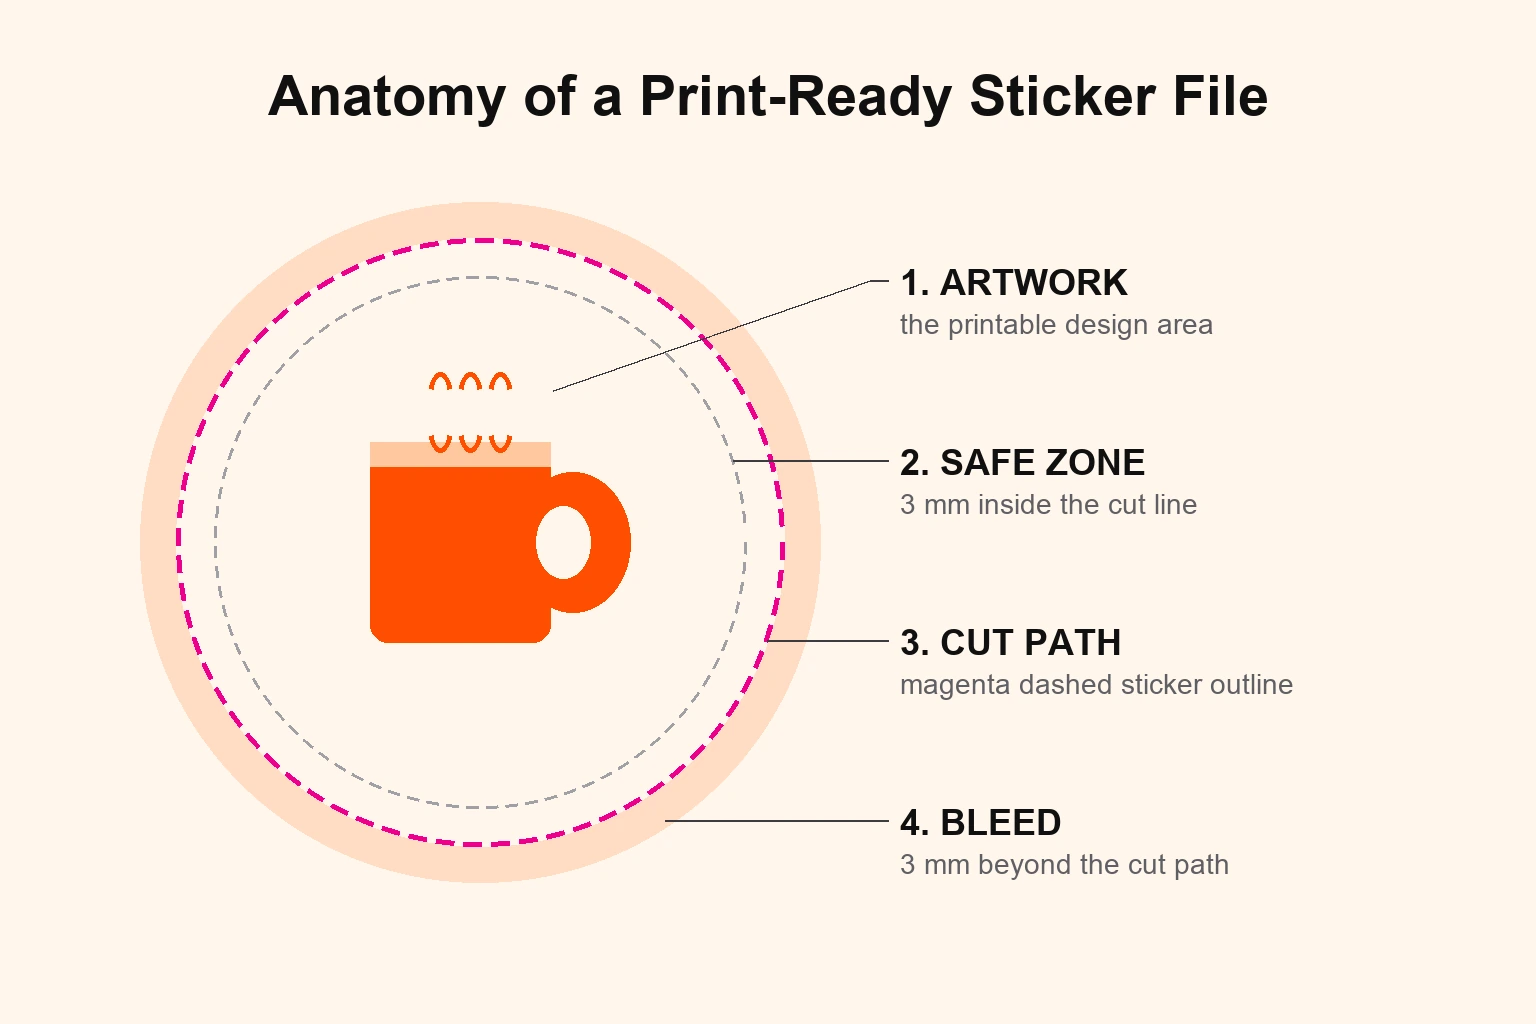
Most design subscriptions advertise "source files included." For stickers, that phrase is doing a lot of work, and not all of it is true. A print-ready sticker file is not a JPG of your logo at 1080×1080. It is a production-grade vector file that contains six specific things:
- A vector outline of the artwork in AI, EPS, or PDF format. Vector means the file can be scaled to 6 inches or 60 inches without pixelation. Raster files (JPG, PNG, even high-resolution ones) are not vector. Most sticker printers reject raster-only submissions.
- A dedicated cut-path layer. This is a single-stroke vector line, almost always named
CutContourorThru-Cut, on its own layer, in a spot colour (typically magenta), set to overprint. The printer's cutting plotter reads this layer to know where to cut. Without it, your printer guesses — and they usually guess wrong. - Bleed of 3 mm (about 1/8 inch) extending beyond the cut path. When the cutting blade drifts even half a millimetre, the bleed prevents a white edge from showing on the finished sticker.
- A safe zone of 3 mm inside the cut path. All your important content — text, logo edges, faces — must sit inside this line. Anything outside is at risk of being trimmed.
- CMYK colour mode (or Pantone for specific brand colours). RGB is for screens. CMYK is for ink. A file submitted in RGB will be auto-converted by the printer's RIP software and the conversion almost never preserves your brand colours correctly.
- All text converted to outlines. Once outlined, the text becomes a vector shape that does not depend on the printer having the font installed. If text is left "live," your printer may substitute a default font and you will not catch it until the order arrives.
If your current designer cannot deliver all six on every file, you are paying for design twice — once for the original, once for the rework when the printer sends it back. For more on the file standards every working designer should hit, see our breakdown of why most small businesses should not run design in-house.
Die-Cut vs. Kiss-Cut vs. Sheet Stickers: Design Differences
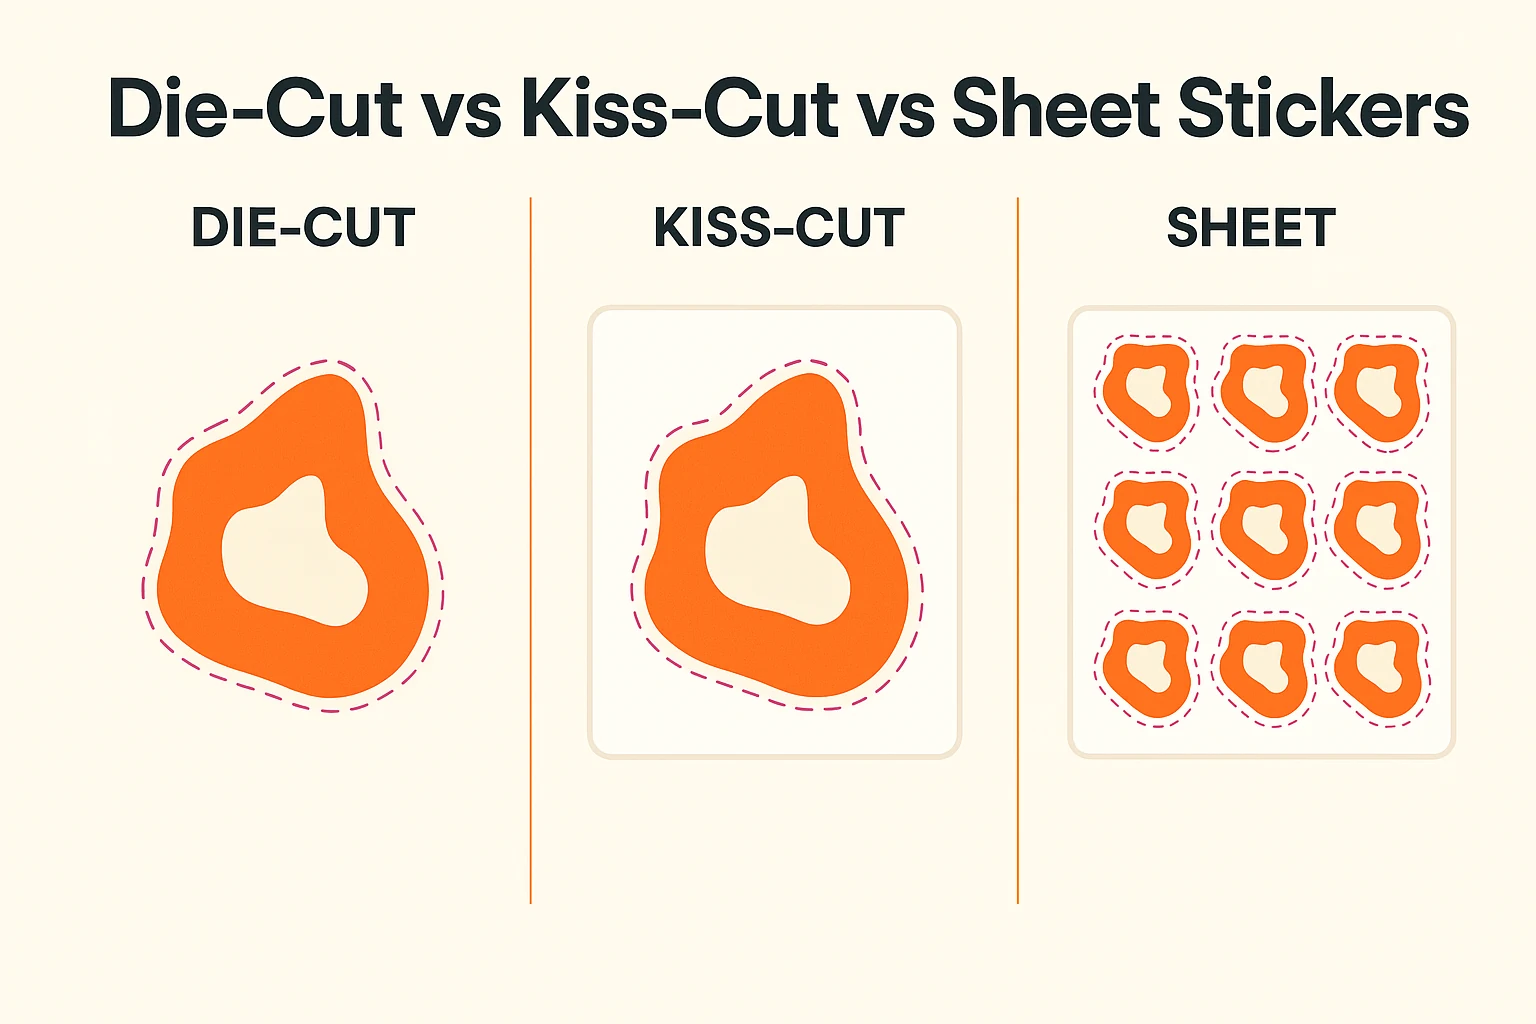
The cut type changes the file. A designer who delivers the same file for all three types is not building for production — and you will see the consequence in your printer's email reply.
Die-Cut Stickers
A die-cut sticker is cut through the vinyl and the backing paper. The finished product is a single sticker shaped to your artwork outline, with no extra material around it.
Design file requirements:
- Single cut path traced around the outer artwork shape.
- 3 mm bleed beyond the cut path.
- 3 mm safe zone inside the cut path.
- The cut path should be smooth — no sharp internal angles smaller than 90° (cutting blades struggle and shred the vinyl on tight corners).
- Minimum cut feature size: about 3 mm wide. Anything thinner risks tearing during weeding (the post-print process of removing excess vinyl).
Kiss-Cut Stickers
A kiss-cut sticker is cut through the vinyl only, leaving rectangular backing paper around the sticker. Most "sticker pack" products on shops like Redbubble and Etsy are kiss-cut.
Design file requirements:
- Two paths: an outer rectangular backing path and an inner shaped kiss-cut path.
- Both paths on separate layers, both in spot colour, both named clearly (
BackingandKissCut). - 3 mm gap between the shaped cut and the rectangular backing edge.
- Same 3 mm bleed beyond the shaped cut.
A common error: designers deliver kiss-cut artwork with only one cut path and the printer ends up trimming to the artwork shape, producing a die-cut sticker instead of a kiss-cut. The file has to say which is which.
Sheet Stickers
A sheet sticker is multiple individual stickers on a single backing sheet, separated by kiss-cut lines so the end customer can peel each one off the shared backing.
Design file requirements:
- Each sticker as its own kiss-cut path on the shared sheet.
- Uniform spacing — 5 mm minimum between stickers.
- Total sheet dimensions clearly defined (a 4×4 inch sheet of nine 1-inch stickers is a different print job to nine separate 1-inch die-cuts).
- Bleed on each individual sticker, not just around the outside of the sheet.
Sheet stickers are the most error-prone format because designers used to single-sticker work often forget that each sticker on a sheet needs its own bleed and safe zone, not a shared one.
The 8 Common Mistakes That Get Sticker Artwork Rejected
These are the exact reasons sticker printers send files back. If your designer hits any of them, you have the wrong designer.
- Submitting a PNG or JPG instead of a vector file. No professional sticker printer (StickerMule, Sticker Giant, Sticker Robot, your local press) accepts raster-only artwork for production runs.
- No cut path on the file. The printer literally cannot cut without it.
- Cut path on the same layer as the artwork. The printer's RIP cannot isolate the cut line — they have to manually rebuild it, and they will charge you for it.
- Text not outlined. The printer's font library is not your font library.
- RGB colour mode. Your bright neon green will arrive as a muddy lime.
- Sharp internal angles in the cut path. Vinyl tears at sharp corners. Round any internal angle to at least 1 mm radius.
- No bleed. White edges on the finished sticker. Customer complains. You eat the reprint.
- Wrong dimensions in the file. A "3 inch sticker" file delivered at 300×300 pixels at 72 DPI is exactly 1 inch on the press. Always design at print size in inches or millimetres at 300 DPI minimum.
How to Brief a Designer for a Sticker Project
Most rework comes from missing information in the brief, not bad design. The brief that gets a print-ready file on the first round contains seven things:
- Sticker type. Die-cut, kiss-cut, sheet, or roll. State it explicitly.
- Final print size in inches and millimetres. ("3 inch" is ambiguous — 3 inches wide or 3 inches diagonal?)
- Cut shape constraints. "Outline of the dog illustration" versus "rounded rectangle around the artwork."
- Quantity and use case. A run of 5,000 outdoor branding stickers needs different vinyl considerations than 50 indoor laptop stickers. Tell the designer the use case so they can flag any artwork that will not survive the medium (very thin lines, gradient-heavy designs in matte vinyl, etc.).
- Printer you will use. Some printers (StickerMule especially) publish their own template files. Share the template if you have one. If not, share the printer's spec sheet.
- Brand colours. Provide CMYK or Pantone values, not "the green from our website." A hex code is acceptable but tell the designer if it must be matched exactly in CMYK.
- Reference images. Three to five existing stickers (yours or competitors) that hit the visual style you want. This eliminates 80% of the revision cycles.
For a more general framework on briefing any design work effectively, see our guide on how to develop a friendly working collaboration with your graphic designer.
The Math: Outsourcing Design for a Sticker Business
A typical small sticker business produces 20 to 60 new designs a month — custom orders, restock variants, seasonal artwork, wholesale client jobs. Here is what each design approach actually costs at that volume:
| Approach | Monthly Cost | Notes |
|---|---|---|
| Freelancer at $50/hour, 2 hours per design | $2,000 – $6,000 | Variable per project. Vacation gaps. No SLA. |
| In-house junior designer | $5,400+ in salary alone | Add benefits, software, equipment, recruiting. Output capped by hours worked. |
| Per-project agency | $200 – $600 per sticker design | At 30 designs/month, $6,000 – $18,000. Brutal at volume. |
| DigitalPolo Partner plan | $399/month | Unlimited tasks, 48-hour SLA, print-ready vector files with cut path included. |
| DigitalPolo Soulmate plan | $899/month | Dedicated team, 24-hour priority delivery, ideal for sticker shops with high recurring volume or wholesale client work. |
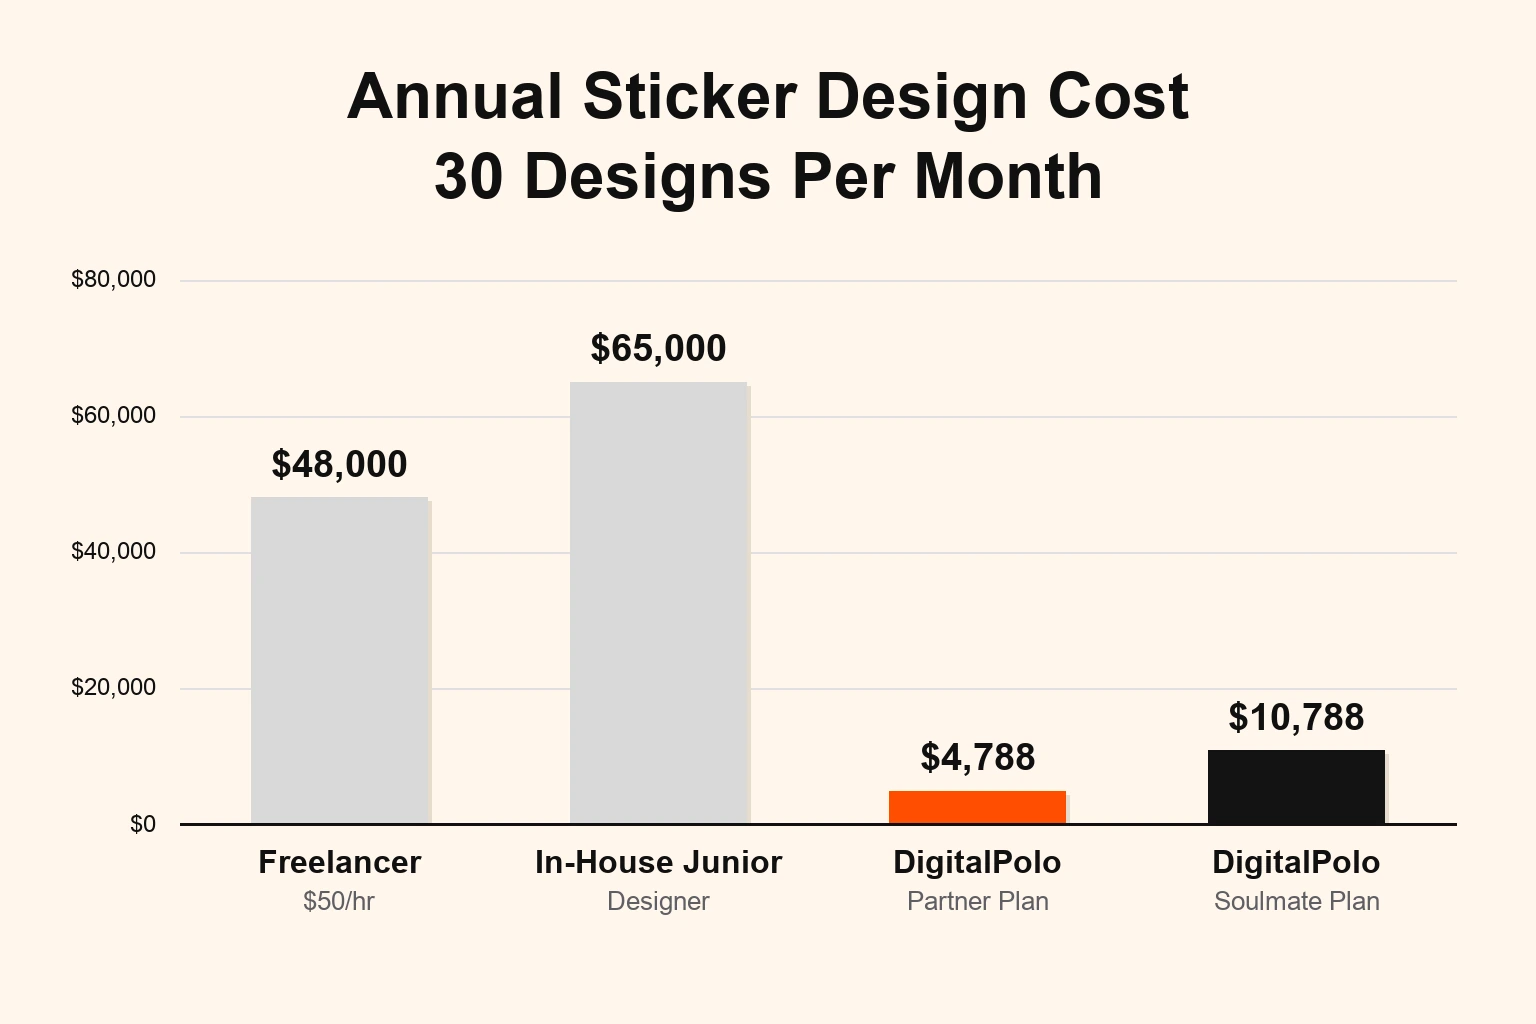
At 30 designs a month, an unlimited subscription is 3× to 15× cheaper than every other option — and you do not absorb the operational drag of a person or the unpredictability of project-by-project freelance billing.
The math gets even more decisive if your sticker business does wholesale or print-broker work for other businesses. Each client account means recurring design requests. At that volume, the Soulmate plan's dedicated team handles the throughput and the brand-consistency challenge in one fee.
Why Unlimited Graphic Design Fits Sticker Businesses Specifically
Most unlimited design subscriptions were built around social media graphics and ad creatives. A handful — DigitalPolo among them — are actually built around the file specs that print-trade buyers need. The fit for sticker businesses comes from four things:
1. Vector source files on every deliverable. Not "available on request." Not "included in the higher tier." Standard on the entry plan. This is the single feature that determines whether a subscription is usable for sticker work or not.
2. High task throughput without surge pricing. Sticker businesses run on volume. 40 designs in a busy month is normal. An unlimited subscription absorbs the spike at the same flat fee. Per-project pricing punishes you for growing.
3. Cut paths and print-trade conventions handled natively. A designer accustomed to working with print shops understands that the cut path is a non-negotiable, that text gets outlined, that 3 mm bleed is the default — not a request. Most generalist unlimited subscriptions have to be trained on this every brief.
4. Reseller-friendly licensing. If you run a sticker business that produces designs for other companies as part of the order (branded stickers, custom merch for clients), you need the right to deliver the artwork file to your client. DigitalPolo allows this explicitly. Many subscriptions restrict reseller use on lower tiers or require you to read the TOS carefully.
DigitalPolo Plans and Pricing
| Plan | Price | Turnaround | Delivery | Best For |
|---|---|---|---|---|
| Partner | $399/month | 48 hours | Unlimited tasks, vector source files (AI, EPS, PDF) with cut path, CMYK on request | Solo sticker shops, e-commerce sticker brands, designers with 15–40 monthly orders |
| Soulmate | $899/month | 24 hours (priority) | Dedicated team, 24×7 support, all source files | Wholesale sticker shops, sticker businesses serving agency/print-broker clients, high-volume custom-order shops |
Both plans include delivery of all source files — vector formats (AI, EPS, PDF) suitable for sticker printing, vehicle wraps, signage, product labels, and promotional product manufacturing. The Soulmate plan's dedicated team is the right choice for sticker businesses where one or two designers need to learn your brand standards, your printer's specs, and your repeat-customer history.
See Digital Polo's full pricing →
Choosing the Right Sticker Printer to Pair With Your Designer
The designer-printer relationship matters as much as the design itself. The major options sticker businesses use:
- StickerMule — easiest spec compliance, publishes detailed template files, fastest turnaround. Premium pricing.
- Sticker Giant — strong on large custom runs and roll formats. Slightly stricter file requirements.
- Sticker Robot — screen-printed stickers, premium quality, specialist file requirements (separate spot colour layers, knockout whites).
- Local screen-print or digital sticker shops — variable spec requirements. Always request their template and spec sheet before the designer starts.
If your designer cannot read and conform to a printer's spec sheet — Pantone calls, knockout specifications, registration marks — you will spend more on rework than you saved on design fees. The unlimited subscription advantage shows up here: a designer working full-time in print-trade workflows knows these conventions cold.
Who Should Use an Unlimited Design Service for Stickers
Right fit:
- Sticker shops with 15+ designs a month in recurring volume.
- E-commerce sticker brands publishing new collections, seasonal drops, or restock variants.
- Wholesale sticker businesses serving multiple clients with custom artwork needs.
- Print brokers reselling sticker work to agencies, restaurants, breweries, or event clients.
- Sticker designers expanding into adjacent products — vehicle wraps, labels, promotional pins — where the same vector-file workflow applies.
Wrong fit:
- Hobbyist sticker sellers producing one design every other month — pay-per-design freelance is cheaper.
- Sticker artists whose primary output is their own original illustration work — keep that in-house.
Frequently Asked Questions
What file format do I need for sticker printing?
Most sticker printers require vector files in AI, EPS, or print-ready PDF format. Files should include a separate cut path on its own layer, 3 mm of bleed beyond the cut line, all text converted to outlines, and CMYK colour mode. Raster-only files (JPG, PNG) are usually rejected by professional sticker printers.
What is the difference between die-cut and kiss-cut stickers for design?
Die-cut stickers are cut through both the vinyl and the backing paper, leaving a sticker shaped to your artwork outline. Kiss-cut stickers only cut through the vinyl, leaving rectangular backing around the sticker. Both need a defined cut path in your artwork file, but kiss-cut also requires you to mark the backing boundary so the printer knows where the rectangle ends.
How much bleed do sticker designs need?
Standard bleed for sticker artwork is 3 mm (about 1/8 inch) beyond the cut line. The safe zone — where your important content must sit — is 3 mm inside the cut line. This keeps your artwork looking clean even when the cutting blade drifts slightly during production.
Can I use an unlimited graphic design service for my sticker business?
Yes. Unlimited graphic design subscriptions like DigitalPolo are well-suited to sticker businesses because they deliver vector source files (AI, EPS, PDF) with every task and handle high recurring task volume. DigitalPolo's Partner plan at $399/month covers unlimited sticker designs, revisions, and print-ready file delivery — usually cheaper than hiring a part-time freelancer for the same workload.
Does DigitalPolo deliver print-ready files for sticker printing?
Yes. DigitalPolo delivers vector source files including AI, EPS, and print-ready PDF formats with every task. Files include correct bleed, separate cut path layers, CMYK colour mode on request, and outlined text — all the production specs major sticker printers like StickerMule, Sticker Giant, and local print shops require.
How long does it take to design a sticker?
A standard custom sticker design typically takes 24 to 48 hours from a clear brief to a print-ready file. DigitalPolo's Partner plan delivers within 48 hours; the Soulmate plan at $899/month delivers within 24 hours on priority. Simpler designs (text-based stickers, logo cutouts) often arrive same-day.
What is the best way to brief a designer for a sticker design?
Give the designer five things: (1) final print size in inches or millimetres, (2) intended cut type — die-cut, kiss-cut, or sheet, (3) printer you will use and any spec sheet they provide, (4) brand colours in CMYK or Pantone, and (5) the use case — outdoor, indoor, vehicle, packaging seal. A clear brief gets the file right on the first round and saves a revision cycle.
Verdict: How Sticker Businesses Should Outsource Design in 2026
If you run a sticker business doing more than 15 designs a month, the cheapest, fastest, and most production-reliable approach in 2026 is an unlimited graphic design subscription that delivers vector source files with cut paths as standard, not as an upgrade. That narrows the credible options down quickly, because most subscriptions were built for digital marketing artwork and never properly grew into print-trade workflows.
DigitalPolo's Partner plan at $399/month covers a solo sticker shop or a small e-commerce sticker brand comfortably. The Soulmate plan at $899/month is the right choice for wholesale, print-broker, or multi-client sticker businesses where a dedicated team needs to internalise your printer's specs, your brand colours, and your repeat-order history. Either way, the math beats the alternatives — freelance retainer, junior in-house designer, per-project agency — by a margin large enough that the decision is not close.
For broader context on how unlimited design compares across budget, volume, and feature set, see our comparison of the eight best unlimited graphic design services for small business and the full Design Pickle alternatives breakdown.
Need Print-Ready Sticker Design Files Without the Hiring Hassle?
DigitalPolo delivers vector source files (AI, EPS, PDF) with every task — ready for sticker printing, vehicle wraps, signage, and promotional product production. Cut paths, bleed, CMYK colour mode, and outlined text included as standard. Partner plan from $399/month. 48-hour turnaround. Unlimited revisions.
- See Digital Polo plans and pricing →
- Book a free 15-minute call →
- See recent design work in the portfolio →
Further reading for sticker shops and print-trade buyers: